One v One: A6M2 Zero versus F4F-3 Wildcat By Chuck Hawks This "One v One" article is based
primarily on historical information, augmented by my experience
"flying" these fighters on the Warbirds game simulator. Warbirds (and the similar Aces High) gives the armchair pilot a
unique opportunity to experience simulated air combat in and against a large
selection of WWII aircraft, including almost all of the significant fighter
planes fielded by the Allied and Axis powers between 1940 and 1945. The
specifications used in this article were taken primarily from Mitsubishi A6M2 Model 21 Zero-sen 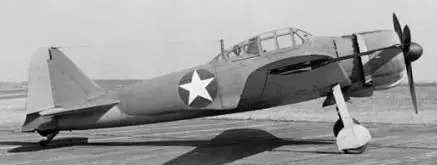 The A6M2 was the first mass produced version of the famous Mitsubishi Zero (Zeke) fighter. It was the front line Imperial Japanese Navy fighter in service during 1941 and 1942, operating from IJN aircraft carriers at Pearl Harbor, Coral Sea and Midway. In the latter part of 1942 the improved A6M3 Zero began entering service with front line fighter squadrons and A6M2's were increasingly used as ground attack fighters. Late in the war, surviving A6M2's were expended as Kamikazes. Based on Japanese experience fighting in China and Manchuko, often against highly maneuverable Soviet I-15 biplane and I-16 monoplane fighters, Japanese fighter pilots came to regard extreme maneuverability as a fighter's most important quality. When the IJN started looking for a modern successor to the A6M5 (Type 96), they demanded a fast, long range, heavily armed and yet highly maneuverable replacement. Mitsubishi met this difficult requirement with the extraordinary Zero, even though Japanese aero engines were less powerful than those available in the US, UK and Germany. Aerodynamically "clean," the streamlined Zero boasted a closely-cowled radial engine with a large propeller spinner to reduce drag. (These features were also used by Kurt Tank for the FW 190.) It was a beautiful airplane, one of those designs that just look right. At its introduction, the A6M2 was the world's first long range, single seat fighter. The early A6M2 Model 11 had fixed wing tips, but the subsequent Model 21 had folding wingtips to increase the clearance on Japanese aircraft carrier elevators. The A6M2 was heavily armed with two .303 (7.7mm) machine guns and two 20mm cannon (the former in the cowl and the latter in the wings). Along with the Bf 109E, the Zero was the most heavily armed fighter of its time and introduced the use of cannons in fighter planes. It was also respectably fast for 1940, with a top speed of 331 MPH. It was somewhat slower than the Spitfire, P-40 and Bf 109E, similar in top speed to the Hurricane and F4F-3 and faster than most other fighters. The Zero was the fastest carrier borne fighter of its time. Perhaps more important, it had very good acceleration. Due to its light weight, large wing area, low wing loading and big ailerons, the Zero was more agile than any contemporary foreign fighter. The initial climb rate was very good and the Zero could climb at a very steep angle, unmatched by contemporary fighters. The sustained climb rate was good, better than the US fighters in service at the beginning of the war, but inferior to that of the more powerful Messerschmitt Bf 109E. Opponents who survived quickly learned from bitter experience not to attempt to turn with a Zero. Other excellent features included a roomy cockpit, greenhouse canopy that afforded good all-around visibility and wide track landing gear. One peculiarity was that the gun selector and firing switches were on the throttle lever, rather than the joy stick. However, in order to satisfy the IJN's demanding specification, some severe design compromises were necessary. An extremely light weight structure was the only way to provide the range, speed and agility required with the available power plant. The most prominent sacrifice to reduce weight was a complete absence of pilot protection. Unlike the Wildcat, the A6M2 airframe was very lightly constructed and no pilot armor or self-sealing fuel tanks were incorporated in the design. Early in the war, even the radios were removed from Zeros in the field to reduce weight! The Zero's performance was its pilot's only protection. This was fine with most Japanese fighter pilots in 1940/1941, when the Zero handily out performed the Allied fighters it met, and it suited their offensive spirit. However, when Allied fighter performance caught up with the Zero, pilot losses increased dramatically. In order to keep the loaded weight down, only 120 rounds of 20mm cannon ammunition (60 rpg) was carried, so there was a premium on accurate gunnery. To partially compensate, a generous 1360 rounds of 7.7mm machine gun ammo (680 rpg) was provided, but it was very difficult (verging on impossible in the case of a Wildcat) to shoot down most Allied fighters with just two .303 caliber MG's! Perhaps the A6M2's biggest performance weakness is that its controls become stiff and unresponsive at speeds above about 180 knots. This is a real consideration for a Zero bouncing an enemy aircraft from above. Pull back the throttle in a dive to control your rate of descent, or you may have a close encounter of the fatal kind with Mother Earth. The lightweight airframe and thin gauge duralumin skin was quite susceptible to damage and the latter limited the maximum diving speed. The unprotected gas tanks made the A6M2 easy to set on fire. Unlike most WWII fighters, the Zero is fairly easy to shoot down with .30-.32 caliber machine guns, such as carried by the Mk. I versions of the Hurricane and Spitfire. A well placed burst from the .50 caliber guns of a Wildcat could quickly flame a Zero. A6M2 MODEL 21 SPECIFICATIONS:
COMPARATIVE STRENGTHS:
COMPARATIVE WEAKNESSES:
The Zero was a pilot's delight to fly, responsive to control inputs, a stable gun platform, easy to take-off and land. With the possible exception of the Nakajima Ki-43, the Zero was probably the most acrobatic fighter of the war. No Allied fighter could "turn and burn" with a Zero. It became the most numerous of all Japanese fighters, with about 10,500 of all models produced. Grumman F4F-3 Wildcat 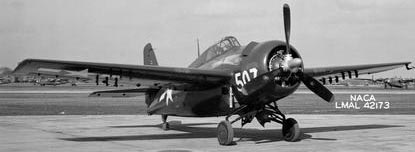 The United States Navy's carrier based counterpart to the Zero at the beginning of the Second World War was the Grumman F4F-3 Wildcat, the first mass produced version of this famous fighter. The Wildcat proved to be exceptionally rugged, able to survive considerable battle damage. It was also more maneuverable than other Allied fighters and faster than a Zero in a dive. Its sustained climb rate was inferior to the A6M2, but its straight line speed was similar. The Wildcat made up for a less streamlined shape with more power. However, this made it short-legged. It boasted a higher service ceiling, important because a Wildcat pilot always wanted to engage a Zero from a higher altitude. The F4F-3 incorporated such defensive refinements as pilot armor and self-sealing gas tanks. The later, standard equipment on F4F-4 models, were retrofitted to F4F-3 models in the field shortly after Pearl Harbor. These features were absent from the A6M2. Offensive punch was provided by a total of four, wing mounted, .50 caliber Browning machine guns with 1720 rounds of ammunition (430 rpg). The Wildcat's cockpit was cramped and the lay-out not particularly well designed. The pilot's seating position is low in the fuselage and the dog house canopy with wide braces impedes visibility. A bulkhead behind the pilot's' head completely blocks the view to the rear. Still, the Wildcat is better in terms of pilot visibility than the later Hellcat. I can't imagine why the Navy did not force Grumman to modify its fighters to improve pilot visibility. You can't shoot what you can't see. Like the Zero, the Wildcat was progressively modified as the war continued. The F4F-4, due to British Royal Navy demands (the Royal Navy also used Wildcats), carried six .50 caliber Browning machine guns and featured manually folding wings for easier carrier storage. (The wings were folded and unfolded by the deck crew.) Unfortunately, the total quantity of ammunition carried, 1720 rounds, remained the same. This meant that with 50% more guns, the pilot of an F4F-4 exhausted his ammo supply proportionally faster, while the folding wings and two additional heavy machine guns increased the airplane's weight, decreasing performance. On balance, most USN pilots preferred the earlier F4F-3. The general sentiment was that four .50 machine guns were sufficient to deal with the lightly built Japanese planes and having more shots per gun was a definite advantage in a "fur ball." The Wildcat was the most agile plane in the Navy inventory, the best "turn and burn" fighter and the most fun to fly. The F4F-3 was generally forgiving in the air, although its narrow track landing gear caused handling problems on the ground. The landing gear was retracted manually, by the pilot turning a crank. Because it was lighter and landed slower than the Hellcat and Corsair (although faster than a Zero), the Wildcat was ideal for use on small escort (Jeep) carriers and fulfilled that role throughout the war. The final development of the Wildcat was the FM-2 version, built by General Motors. It had a more powerful engine and consequently better performance, while reverting to the preferred four gun armament, allowing more rounds per gun. F4F-3 SPECIFICATIONS:
COMPARATIVE STRENGTHS:
COMPARATIVE WEAKNESSES:
The Wildcat was the featured USN fighter at the battles of the Coral Sea, Midway, Santa Cruz and at Guadalcanal. It also saw action in the Atlantic/Med. during the invasion of North Africa (Operation Torch). It is hard to see how the USN could have endured until the Hellcat was introduced in 1943 without the Wildcat. Although the Zero had important performance advantages over the Wildcat, the A6M2 was never able to dominate the F4F-3, as it did other period Allied fighters (Hurricane, Buffalo, P-36, P-40, etc.). Ultimately, Wildcat pilots prevailed against Zero pilots by means of better tactics and, later in the war, better training. Operating in four ship flights and two ship elements, instead of the three plane Vics used by the Japanese, gave Allied pilots more flexibility in air to air combat. Teamwork, such as the famous Thatch weave, was an effective antidote to the Zero's superior performance. By the end of the war, the various Wildcat models had proven very effective in air to air combat and recorded slightly in excess of a 6 to 1 kill ratio. 1v1 Combat The Zero holds significant performance advantages over the Wildcat. In a 1v1 dogfight where neither pilot has an advantage at the start (equal altitude and speed), the Zero is likely to prevail, given pilots of equal ability. The Zero can out maneuver the Wildcat in the vertical or horizontal planes. Also, it is easier for the Zero pilot to see and keep track of the Wildcat's position during a dog fight than vice-versa, because of the Zero's greenhouse canopy. As mentioned, the Wildcat pilot sits too low and a bulkhead behind the pilot prevents seeing astern. Wide braces in the Wildcat's small doghouse canopy serve to further block the pilot's view. The relatively fragile Zero should make every effort to avoid head-on passes with any enemy fighter. With its cannons, the Zero has better firepower in absolute terms than the Wildcat, but the fragility of the Zero makes head-on passes extremely dangerous. The Wildcat's four, fast firing, .50 caliber machine guns can blow a Zero apart in a heartbeat. If necessary, fake a head-on run and then dodge below the Wildcat just before he starts shooting. Go vertical by pulling into a tight loop immediately after you pass below him to gain the advantage. If he reverses direction, you will complete the loop on his six. If he also loops into the vertical, you will be able to cut inside of his arc for a deflection shot. If he maintains his course, you can get above and behind him with an Immelmann turn instead of completing your loop. Alternatively, zoom climb off to one side and then pull into a turn back toward the Wildcat, keeping him visible in the front lower corner of the Zero's canopy. This gives the Wildcat pilot a low percentage deflection shot, or no shot at all, while you turn onto his tail. Once you get him turning toward you to bring his guns to bear, he is fighting your fight. From a Wildcat pilot's perspective, an altitude advantage is the key to successfully engaging a Zero. The safest and most successful method of attack is to "boom and zoom." If you start above the Zero, you can dive on him from above, converting altitude to speed during your firing run. When you pass the Zero, zoom climb to regain altitude (and hence the advantage). He must either pull into your attack (a head-on pass, advantage Wildcat) or jink and turn to avoid your bullets. If the Zero is evading, he probably isn't shooting at you and any shot he gets will be a low percentage, high speed deflection shot. If you convert your speed energy back into altitude via a zoom climb, he will not be able to use his superior sustained climb rate to catch you. (If he tries, you can reverse back down on him and nail him while he is hanging on his propeller, scratching for altitude at the edge of a stall.) Repeat the process until the Zero pilot makes a mistake and runs into your bullets. The Wildcat's advantage in ammunition supply can become important in a long engagement, where the Zero pilot is likely to exhaust his small supply of 20mm shells. The worst situation, from the Wildcat's perspective, is to be forced to fight with a Zero above him. If the Wildcat pilot has sufficient altitude, a vertical dive toward the earth should achieve separation and allow him to disengage. Remember, the Wildcat can out dive a Zero, as long as there is sufficient altitude. You must strive to keep your energy up. The F4F-3 can get mushy on the controls when it runs out of energy. You don't want to fight a Zero low and slow! Caught at low altitude by an enemy high above, whether in a Zero or a Wildcat, hug the earth so that he cannot come down in a high speed dive without fear of diving into the ground. If his speed is much higher than yours, you should be able to out turn him. The Wildcat rolls faster than a Zero and this can be used to make your Wildcat a difficult target if a Zero is on your tail. Conversely, the Zero can pull tighter horizontal turns than a Wildcat to avoid his bullets. The A6M2 is a slightly superior dog fighter to the F4F-3, but the two are close enough in performance that the better and more experienced pilot will usually win. I have seen this many times in Warbirds, from both sides! Historically, during the first part of the war when the Japanese pilots were better trained and had more experience, the Zero maintained a favorable victory ratio. Later in the war, when Allied pilots had the advantage in training and experience, the Wildcat achieved a favorable kill ratio. |