|
Building a Custom 6.5mm Creedmoor Hunting Rifle By Shane Morgan  The love of firearms is something we all enjoy and share on Guns and Shooting Online. The ability to be able to build your own rifle is a gift that I enjoy immensely, but when a friend asks you to build them a special rifle, then it becomes a pastime that completely engulfs me. Half way through last year, my good friend Todd asked me to build him a medium weight hunting rifle to be used up in the hills and mountains of the central west plains of New South Wales, Australia, where we spend most of our hunting time. Todd had been reading about
Hornady's new cartridge, the 6.5 creedmoor, designed specifically to be a long
range competition cartridge. Anything that is designed for competition
will always attract my attention. I had already built a rifle in 6.5x47 Lapua
and offered to build him one in that cartridge, but he wanted something that I
did not already have and, of course, it was new and available. Thus, the 6.5 Creedmoor
was in the pipeline. The 6.5 Creedmoor sits between the 260 Remington and
the 6.5 x 47 Lapua in case size, which makes it a great size case on which to
build a rifle and it fits into a short action. Like most of my builds, I
used a basic Weatherby Vanguard rifle and stripped it down to only the action,
trigger and guard. I find these actions to be excellent in strength,
workmanship and cost, which tends to make my decision very easy when it comes
to action selection. The stock for this build is a Richard's Micro fit in
a straight line thumbhole style laminated timber stock. Todd chose the Desert
Sunset laminate color, which at first was a little different, but the finished
product was quite appealing to the eye and worked better than I had thought it
would. I then made a set of light weight aluminum alloy bedding pillars, set
the stock in a milling machine vice and drilled out the stock holes to take the
pillars. They were then epoxied in place, leaving about 0.020" protruding
on both the bottom and top of the stock. A quick check to make sure the
action screws lined up and the stock was then set aside until later for bedding
after the new barrel was machined, cerekoted and assembled. The scope mounts for this
build were a Ken Farrell picatinny rail with EGW 30mm rings and the scope to be
mounted was a Bushnell Elite 4200 series 6-24 x 40mm with a 30mm main tube and
a Mil-Dot reticule. I have found Bushnell Elite scopes to be very accurate,
with fine quality optics and well sealed against dust and moisture. The barrel I used for this
build was M.A.B medium contour barrel made by T.S. Engineering with a 1-8"
twist and a finished length of 24.5". I have found these barrels to be
excellent in quality and reliability over the years. They are manufactured in
Australia, which makes it easy to purchase without the need to import barrels
from overseas. The 6.5 Creedmoor reamer and Go / No Go gauges were
purchased from Manson's Reamers in the U.S., which I have always favored because
of their quality and finish. Machining was fairly straight
forward with no problems, but I kept the chamber to the tight side with about
0.001" clearance on the Go gauge. The barrel was then machined with a
recessed, target type crown, which I then lapped by hand using diamond paste
and a marble. This removes all burrs and deformities around the end of the
rifling. The barrel and action were then cerekoted in Tactical Grey color
separately, before the barrel was fitted to the Vanguard action and
tightened to 60 ft. lbs., as I don't believe in over tightening the barrel or
placing excess pressure on the action. Once the barrel and
action were fitted, the stock was then prepared and the action was bedded for
the full length and about 1" past the recoil lug, so that the action
pillars are flush with the finished epoxy. This gives a very secure and strong
base for the action. The next time consuming job
would be the finishing of the stock, which in most cases takes longer than
machining the barrel and fitting it to the action. I started with a 180 grit
sandpaper to smooth out a very rough finish, which unfortunately is common with
Richard's micro fit stocks. (However, they usually finish up very good!) Once
I had most of the stock smooth and I had removed most of the ugly cuts, I
started with 240 grit wet or dry paper. I tend to perfer an oil-rubbed
finish, which I feel brings out the best in a laminated or walnut stock. In
addition, an oil finish makes it much easier to repair minor bumps and
scratches, compared to polyurethane finishes. Once the rubbing starts, I
will continue on with each grade of paper, then leave it until the next day
before starting with the next grade. This process continues until I reach my
target, which in this case was 1000 grit. Once I was happy with the finish,
I allowed the stock to hang in my garage until the oil has completely dried on
the outside, which usually takes a week, before I buff using a wax which has an
orange fruit aroma. This wax not only gives the stock a brilliant satin finish,
but also has a great smell that is quite pleasant when holding the rifle to
your cheek. When the rifle and stock are
finally placed together and tightened, I added the scope mount. In all
cases, I bed the mounts using plastibond. This eliminates any chances of
stressed mounts or pressure on the scope and helps with accuracy. For me,
the the job was then finished and I turned the finished rifle over to Todd, who
was patiently waiting to mount his scope and test fire his first, hand-loaded
rounds. To say he was pleased with his rifle would be an understatement! 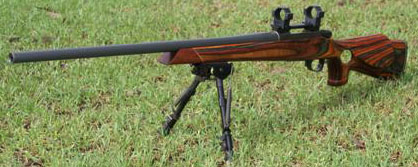 My friend Todd's initial reloads were all based on using Hornady's 140 grain SST projectile; his powder was ADI 2209 and he used CCI large rifle benchrest primers. The cartridge OAL with 140 grain SST was 66.8mm. All groups were three shots at 100m. Starting loads were as follows (powder in grains - average velocity in feet-per-second; group size):
To say that I was impressed with the 6.5mm Creedmoor's performance would also be an understatement. This rifle, as can be seen in the numbers above, shot best with a load of 41.5 grains of powder with an average velocity based on three shots being 2790 fps. The round is turning out to be an extremely accurate cartridge for hunting and, although I have no idea how it is performing as a target round, I feel it will be a winner. The rifle has, so far, been used in the field only once. It dispatched feral goats very easily out to the 400m mark. We have not yet tested it on heavier game, such as feral pigs or deer, but if its ease of use, light weight and deadly accuracy are anything to go by, I will probably build a rifle in 6.5mm Creedmoor for myself in the very near future. I think it is safe to say that the 6.5mm caliber is definitely a winner and should not be over-looked. The number of available 6.5mm (.264") bullets is ever increasing and I feel the 6.5mm Creedmoor has a bright future. |