|
Building a 6.5x47mm Lapua Hunting Rifle By Shane Morgan 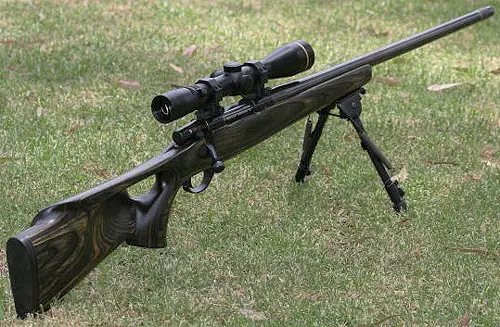 There is nothing more exciting than buying a new rifle or trying out a new cartridge or caliber. The anticipation builds the more we read and research the firearm that we are wanting. A very big exception may be building the rifle yourself the way you want. I did not get into shooting or hunting until I was about 18 years of age, due to the area where I was living and the fact that my father had no interest in firearms, but after I did, the love of hunting and shooting has stuck with me ever since. As I had learned a trade after leaving school (Fitting and Machining), it gave me the qualifications and ability to be able to machine and carry out basic gunsmithing jobs like chambering and cutting screw threads on the tenons. The joys of finishing off stocks, checkering and pillar bedding was a self taught art that I am still learning, but continue to strive to achieve. My trade has always allowed me the option of building my own rifles, but it has only been in the last couple of years that I have been in a financial position to buy a lathe in order to accomplish my dreams. About half way through 2007, my interest in the new target round introduced by Lapua, the 6.5x47, was growing and I got to the point that I decided to build myself a rifle for this cartridge. The articles I had read, plus feedback from target shooters, said that this cartridge could be the future in accuracy and efficiency. In my usual fashion, I decided that if it is good enough for those people, then it should make a good hunting cartridge for me. In Australia, the option for such a rifle chambered in a cartridge like this is usually left to custom rifle makers, who are scarce down here and very expensive. My first hurdle was getting a reamer and gauges made for this cartridge, but this turned out to be simpler than I expected. A quick email to Manson's reamers had an order on its way in no time. I had used Manson's reamers in the past on another build and found the quality of their tools to be excellent. That accomplished, I had to get brass and at that time hardly anyone in Australia had heard of the 6.5x47 Lapua, never mind the brass. I eventually ordered the brass online and had it sent to a good friend of mine in the States, who then forwarded it on to me. As usual, I had to go through all the Customs hassles of bringing anything related to firearms into Australia. The next question was what kind of hunting rifle did I plan on building? Most of my hunting and shooting is done on private property and relates to culling feral animals, which are destructive to native species and a nuisance to farmers. I decided to build a heavy barrel varmint rifle with a laminated thumbhole stock. The stock was an easy choice, as I had used laminated stocks from Boyd's before and intended to use one of their varmint models, which filled the bill beautifully. Their laminated stocks are sent unfinished, which saves on cost and allows me to finish the stock however I choose. This one would be black and grey and would have an oil rubbed finish down to a 1000 grit, making it not only practical for the task in mind, but great looking. The barrel was ordered from Australian barrel maker MAB Barrels, now known as TS Engineering. They supplied me with a 26" chrome-moly barrel with a 1-8 twist in a heavy contour. The actions I use for my rebuilds are Weatherby Vanguards. I buy the basic rifle complete with a plastic stock then strip it down to just the action and sell the rest of the parts on EBay. This keeps my costs down. I chose the Vanguard action because it is a very strong, flat-bottomed action with a built in recoil lug. The Vanguard is well made and a lot cheaper (not to mention better quality) than most of the big manufacturers' rifles. I then remove the original barrel, machine and fit my new one in the cartridge I have chosen. When fitting the barreled action to the stock, I always pillar bed with aluminum (or steel) pillars and epoxy bed the action up to about 1" under the barrel; with this one it was aluminum pillars. The epoxy bedding is done so it just sits on top of the pillars, as I make it so the pillars protrude a little from the stock by under-cutting it with a Dremel tool. This allows the epoxy to settle down and around the pillar so that the whole bed rests on the pillar and is supported. I free float the barrel up to the epoxy bedding. After completing the stock finish and fitting the barreled action, it was time to choose my scope and mounts. As I like a very firm base to work from, I always use Picatinny rails and mounts. For this rifle, I chose Tactical Precision rings and mounts. The scope would be a Leupold VX-III in 4.5-14x40mm with a Varmint Hunters reticule. I found this reticule excellent in its range markings for the velocity of the 6.5x47 Lapua, as I will discuss further in load development. The original trigger off the action was lightened by a person I discovered on EBay and his work was brilliant. The adjusted trigger has a smooth, two-pound release, which is great for varmint shooting. Once completed and assembled, I was very proud of the finished rifle. It is stylish, comfortable and when brought to the shoulder, it fits me beautifully. Of course, having a good looking, functioning rifle is not much good unless you have something to shoot in it. The next chore was load development, as none of the reloading manuals I had included loads for the 6.5x47. I only had heresy information from online forums relating to their reloads; unfortunately, many of the powders mentioned are not readily available in OZ, so I purchased a reloading program called "Load from a Disc." For those not familiar with this program, I can promise you it is a very valuable tool and quite accurate. The program can be updated from the manufacturer's web page with all the latest cartridge, powder and bullet information. It also gives a reloader the ability to program his own cartridge dimensions into it to design suitable loads. This gave me excellent results when doing my 6.5x47 load development. I decided from the start to simplify load development by choosing 120 grains as the only bullet weight I would use in my new rifle. The bullet I chose for all of my testing was the Nosler 120 grain Ballistic Tip. The 6.5x47 Lapua uses a small rifle primer, unlike most cartridges of its size that use large rifle primers, because it was designed as a bench rest cartridge. I decided to stick with bench rest primers and used Remington #7-1/2 primers for all my load development. The ballistics program gave me a choice of powders, but the system catered to ADI powders and I chose to stick with them, as they are readily available to me. I began testing with a fast burning rifle powder, AR2206, starting with 35 grains and slowly worked my way up to the maximum load recommended by the program of 38.5 grains. This gave me a MV around the 3005 fps, but was not as accurate as I was hoping. The groups were about 1.25" at 100m and I knew that this rifle could do better than that. I changed to a slower powder, AR2209, using the recommended starting loads given by the program. The improvement was immediate. Accuracy was excellent up to around 40 grains, which gave a MV of 2850 fps. I was a little disappointed at the velocity, as I was hoping for 2900-3000 fps, but at 40 grains of powder, the accuracy was dropping off again. I started to work backwards from the 40 grain powder charge and reached a load of 39.3 grains of AR2209. This was giving a velocity of about 2780-2810 fps and the group size was around 0.5" at 100m. I was a happy man and the rifle was shooting exactly the way I had hoped it would. I have since put about 600 rounds of 120 grain 6.5mm Nosler Ballistic Tips through the rifle and the accuracy remains the same. The rifle performs brilliantly out to 485 yards, which is the maximum distance I have shot the rifle. At that range, it delivered a one shot kill of a feral goat. The ballistics program estimated the bullet to be traveling around 1916 fps with remaining energy of 980 ft. lbs. That is plenty to kill most of the feral animals that I cull from farms. The rifle is a joy to shoot with mild recoil, far less than a .308 Win. The rifle is on the heavy side, as it was built to be a heavy varmint rifle and not a carry rifle. It is easily managed by my 15-year-old son, who loves to shoot it. The Leupold VX-III 4.5-14x40 scope performs perfectly, with the velocity of the bullet nearly identical to the estimates of the varmint hunting reticule as stated by Leupold. That is a comforting thought when shooting at long range using the reticle's bullet drop compensation markings. The Boyd's stock fits comfortably in the hand and can take a lot of hard knocks, which if needed can be easily repaired due to the oil rubbed finish. Adding a nice Harris bipod makes this an excellent set-up to lay down behind and shoot feral's to your hearts content. |