|
Building a 7.62mm Jonson Rifle By Shane Morgan 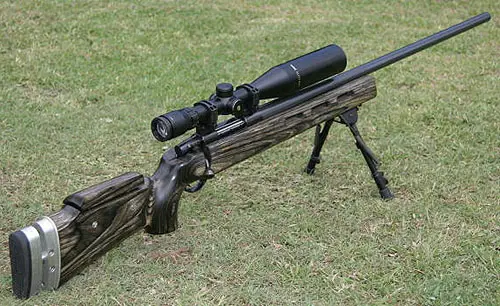 My fascination with wildcat cartridges goes back many years. As someone who can build his own rifle in the caliber of his choice, it is only natural that I would want to build something that not everyone else can have. I have always admired the rifle builders and wildcatters in the world who were not afraid to modify or change an existing cartridge, sometimes for the better and sometimes not. Wildcat cartridges always seem to pop up over night whenever a new cartridge is released. I first became aware of the Jonson family of cartridges through e-mail's with Bryan Jonson, who I met on the Guns and Shooting Online Member Message Board. This message board has allowed me to meet many good friends with whom I often correspond. One very good friend invited me to stay with him and his wife in May of 2008, one of the most enjoyable times I have had and my first visit to the United States. It was through the pages of the Member Message Board that I happened to correspond with Bryan, who had many years before modified a 416 Rigby case by shortening it to fit a short action rifle. Bryan began by creating a design in a ballistics computer program and then making it a reality. Jonson cartridges are very accurate and Jonson Arms is now a commercial business. (See their banner at the top of the Guns and Shooting Online Home Page.) The start of my journey was not without hiccups. Waiting for many months for the manufacture of reamers, gauges, reloading dies and forming dies before I could even start my new project was both frustrating and, as the Australian dollar dropped against the US dollar, became expensive as well. I started to question my belief that the hassles and financial pain would be worth the trouble, but I persevered and eventually received all of the tools needed to build the first bolt action rifle in 7.62mm Jonson. As I have done on several previous occasions, I decided to build my new rifle based on a Weatherby Vanguard action. The main reasons are that the Vanguard is a top quality, very strong, reliable action and the price is right, making it ;cheaper for me to build my own rifles. The original purchase was a standard Vanguard in blued steel. I then stripped the firearm down, removing the barrel and stock and selling what parts I could on EBay to cut costs. The 7.62 Jonson design is based on the 416 Rigby case and that made my choice of standard rifle simple. I purchased the closest rifle in a cartridge similar to the one I was building and that was .300 WSM. The fact that the .300 WSM is a fat cartridge based on a magnum case rim diameter of .535" made it easy to adapt to the Jonson cartridge. The Jonson case rim measures .590" and the base diameter is .5949", but it fit into the rifle's magazine and feeding was therefore no problem. As most of my shooting in Australia is long distance and at feral animals, it was not that hard to decide what type of rifle I was going to build. I decided that it would be an ultra-long range rifle with a heavy barrel, designed to be fired from the prone position. This is what I love to do, so I planned every thing around a high velocity, .30 caliber cartridge capable of pushing a heavy 200 grain projectile at 3000 fps. That was the plan, anyway. I purchased a barrel from TS Engineering (MAB Barrels) in Australia. I had used their barrels before and was satisfied with their product. The barrel I ordered was a 31", No. 8 contour barrel, identical to a barrel I had used on a .300 Weatherby Magnum project about 6 months earlier. The 7.62 Jonson chamber reamer finally arrived, being sent to me by Bryan from the States. He had only just received reamers and gauges from Dave Manson of Manson's Reamers, so now I was finally in a position to start machining. The first job was to remove the original barrel, which on Vanguards is difficult, as they are very tight from the factory. As usual, I had to machine a small recess groove between the barrel and action so the seal could be broken using a barrel wrench and vice. Once that was done, removal was quick and simple. The next job was to true up the Vanguard action using a mandrel I had made that fits through the action and can be centered on the lathe. The end of the action was then machined square and true with the axis of the action. The new barrel was then placed in the lathe with both ends of the bore dialed in with a dial indicator so that the barrel was sitting parallel with the machine and the rifling running to with in 0.01mm. The barrel was then chambered with no problems and the tenon threaded to fit the action. After removal, the barrel was again re-set and dialed in so the muzzle crown could be cut. For this, I used a recess cut to about 2mm depth, which will give good protection for the end of the barrel. Then, using a small marble and a diamond paste abrasive, I hand rubbed a clean chamfer on the muzzle, leaving no burrs to affect the projectile. Once the barrel was finished, I decided to try a different method of finishing it. I had usually used Birchwood bluing compound to finish the rifle by hand, but was never happy with the result, as it was never as good as a professionally blued barrel. This time, I used a product called Cerekote, manufactured by Nic Industries, which is a baked-on ceramic coating. The first go was a disaster, not the product's fault but mine, as I did not allow the barrel to air dry for 30 minutes prior to baking, which is clearly stated in the directions. Once it had dried, I cut back the finish, which I was very impressed by, as it was extremely hard to remove. I re-sprayed the barreled action using a high volume, low pressure spray gun. After air drying for 30 minutes, I placed it in my backyard Bar-B-Que, which has a temperature gauge on it, and baked it at 250 F for two hours. I did not spray the tenon thread, having covered this, as well as the rifling and chamber, with masking tape. To say the finish was excellent would be an understatement, I was extremely impressed with the finish, which according to the makers is extremely corrosive, chip and chemically resistant. So far, I have found those claims to be true. The color I chose was Sniper Grey, which I thought went with the style of the rifle being built. The rifle and action were then screwed together using a barrel vice and wrench. Next, I machined the face of the bolt to accept the head size of the Rigby case and adjusted the extractor to fit comfortably, which was a simple task for a machinist. It is always a bonus when something works right the first time and in my case this rarely happens, so I was a happy man. The rifle stock I chose for this build was a prone style Target Culbertson laminated stock from Richard's Micro-fit Gun stocks. The reason for this choice is that I wanted the stock to have weight, a 3" width forend and a high cheek piece. The latter allowed me to cut a section out with a small band saw and make an adjustable cheek piece. The cheek piece was secured using 2x6mm stainless steel bolts with the bolt head removed and the threaded part screwed into the cheek piece. This allows the two steel bolts to slide into holes drilled into the stock, which could then be secured using two small screws situated on the right side of the butt, allowing the cheek piece to be adjusted to the shooter. The adjustable butt plate I
fitted was a 3-way adjustable plate from Master Class stocks. This is perfect
for the prone rifle shooter and very comfortable. As with most of my laminated
and walnut stocks, I stuck to the time proven method of an oil rubbed finish
using a Tung oil based product and using up to a 1200 grit sand
paper. Once allowed to dry for a week, the stock was then polished to a
high patina using citrus scented beeswax, which makes it a pleasure to
put your face against it, as the smell is quite refreshing. The
stock was pillar bedded using steel pillars and bedded in an epoxy resin up to
about 1" along the barrel. This gives the action a very strong and durable
base upon which to sit and holds it firmly in place. My new rifle weighs 7.5kg
(16.53 pounds) without the scope. The scope I mounted on the rifle was a
Bushnell 6500 series 4.5-30x variable with a Mil-Dot reticle. This reticle performed
brilliantly at long range and was very easy on the eyes with the scope set at
30 power. My only beef with the reticle is why they never carry the Mil-Dots
all the way to the bottom of the vertical crosshair. I suppose there is a
reason for this, but it seems like it would be a big improvement to
me. The mount I chose includes a two-piece Ken Farrell Picatinny base in
20 MOA set-up with matching Ken Farrell rings. I have found these rings to
be extremely reliable and very strong. The 7.62mm Jonson cartridge has to be made from .416 Rigby brass. The forming dies make quick work of the brass and it is then cut to length using a trim die. During the forming work the neck of the brass is pressed inward, which leaves too much metal on the inside of the neck; this must be removed. I made a cartridge holder out of stainless steel by running the chamber reamer into the steel turned section that would hold the brass in place within a collet set-up. This allowed me to neck turn the brass and machine the inside neck diameter in the one set-up, which kept the brass uniform and parallel. It was also machined to proper length at this time, which was also a bonus. The brass was then annealed to soften the neck area and shoulder. There are many ways to anneal the necks of cartridge brass. I chose to use the old method of molten lead in a pot and holding the brass in the lead for a count of 10, then dropping it into a bucket of water. As I said, there are many methods, but I find this quick, simple and effective. Once the brass is made and
ready for loading, the fun starts. I use a ballistics program to work out
starting loads for my cartridge and in this case used "Load from a Disc."
I find it extremely accurate and simple to use, simple being my favorite word.
It also allows me to program my own brass dimensions, which was handy for the
Jonson cartridge, as it is not widely known. Of course, there are no loading data
for it, because it is a wildcat. As I live in Australia, I use
ADI Powders. They are easy to acquire and reasonably cheap to purchase, at
least for us down here. The program gave me a range of different powders
to use including two ADI powders, those being AR2209 and AR2213. I chose
the faster of the powders, AR2209. The program gave me an optimal load of
60.1 grains of powder with an estimated muzzle velocity of 2926 fps and chamber
pressure of about 53,949 CUP. I started 10% lower than recommended and made
several test loads to check velocity and pressure concerns. Most of the testing
would be done in the field, as well as the load development. It was
several weeks before I could go out for a shoot, test my new long range rifle
and find out if it could do the job I hoped it would. During the last week in March,
I was able to get out to my favorite hunting property, which is located in the
central west plains of the state of New South Wales. The first test rounds
were loaded with only 55 grains of powder to see how the rifle settled, fired and
extracted the spent cases. These first loads were in the 2700 fps range
and showed no signs of pressure or extractor problems. Armed with this information, I moved up to the recommended optimal loading for the cartridge, which was 60.1 grains of AR2209 behind a Hornady 208 grain A-Max match bullet. It has an extremely high ballistic coefficient (.648) and is a very streamlined projectile. The first three shot group at 100 yards measured around 1". I had only bore sighted the scope and I was pleased to find that the elevation was right on and the windage out 4" to the left. The velocity was 2940 fps. I increased the powder charge to 62 grains and the group spread to about 1.5". The velocity was around 3040 fps. Unfortunately, although the action ejected with no problems and there were no signs of flattened primers, the bolt was tight to lift. The stiff bolt was a warning to me, so I decided to work backwards until the group tightened up and the bolt opened easily. I tried 59.5 gains of AR2209, which gave me about 2870 fps. The group size was excellent at just under the 3/4", which was a great starting place. I loaded a few rounds and moved to my 400 yard range. I use a 4 target array at 400 yards, using the bottom one as the aiming mark and the top target set at center of 51" According to the ballistics program, this is the height (mid range trajectory) of the bullet on its way to an 800 yard zero. The result of three shots was a group measuring 3.5". Shooting less than 4" at 400 yards, I was again a happy man. Now it was time to give the rifle and cartridge a run at live game. The choice of game was feral goats, which congregated on a hill side around 1000 yards distant. I use a Kestrel 3500 series weather gauge to measure the wind and other environmental factors, which is extremely useful and I think necessary for long distance shooting. The first target I selected was a Billy goat at 874 yards. The first shot hit the dirt at his feet, but this miss was my fault, as I had not put the distance correctly into the PDA. I made a quick adjustment and the second shot dropped the goat on the spot. I had a smile on my face the size of a crazy cat. The excitement of a one shot kill by the first bolt action rifle chambered in 7.62mm Jonson, a rifle that I had built, was an extremely exciting and satisfying result that I will treasure for a very long time. Later I killed another goat with a single shot at even longer range. It is rewarding when a plan and a lot of hard work come together to give you a result such as I experienced. This rifle and cartridge combination worked very effectively and was a pleasure to shoot. The recoil was acceptable and I would put it in the same class as an average weight .308 Win. hunting rifle shooting 180 grain factory loads. As I said, I was a very happy man after returning from my shoot! |