|
Harley Paintin' For the Under-funded and Under-skilled By Dave Murray PREFACE I have no skill with a paint gun, so naturally I wrote a couple of articles about painting motorcycles without skill (see below). These articles are 8-9 years old and suggest using lacquer. It worked well, but the 10% ethanol they now put in gas eats right through it. Most spraycan paint is lacquer. Too bad, it was friendly stuff. The techniques in the articles work just as well with modern basecoat/clearcoat finishes as well as catalyzed acrylic enamel. You do need a slightly better gun. I use a $70 Porter Cable HVLP gun. (Get a cheap water trap) I use the same rattle-can spray gray sandable primer/filler as in the article. It works fine. The basic concept is; Spray very light coats. Where the can says "medium wet", I cringe. If they say 2 coats, I shoot 4-5 VERY LIGHT coats. It doesn't flow out as well as a wet coat will, but I get drips trying for wet coats, and it don't make any damn difference, anyway! We are going to get our gloss shine in the final color-wetsand and buffing stages. What's the point of trying for high-gloss application if we're going to sand it anyway? Don't sand between coats. The easiest is catalyzed acrylic enamel, solid color. Your graphics have to go on the surface. (Fortunately, I'm not a graphics guy.) It goes on in one step and can be wet-sanded and buffed just like lacquer. The gloss is excellent, perhaps just not quite as "deep" as basecoat/clearcoat. You do need a mask, organic vapor, not a paper dust mask, for any of them. They don't cost much. These fumes can be toxic and also explosive. No open flames or sparks! If you want the graphics under clearcoat, then you need a basecoat/clearcoat finish. Mix and reduce the stuff exactly as per the directions. The auto paint store will have cheap measuring cups. You can't store it after it's catalyzed, so make up a small amount for your test/practice piece.The two major differences from the articles are:
For small projects, "Dupli-Color" (http://www.duplicolor.com/products/premiumEnamel/) makes spray can enamel. The colors are limited, but it seems to work quite well. There is a clearcoat. Don't rush it, allow the specified dry time between coats. If you recoat a partially cured layer, it can take forever to dry. I haven't tested it with gas, but, as an enamel, I suspect it should be OK. If you've never painted before, this would be a cheap way to practice. Get a spraycan "trigger" from the hardware store, then prime and paint a small project. You'll get the "feel" of it quickly. You will surprise yourself! 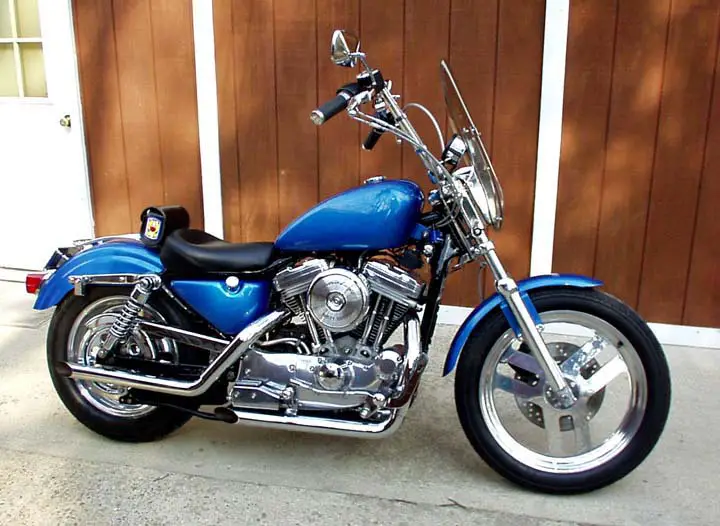 The previous owner of my '96 Sporty obviously stored his polishing rags in his kid's sandbox. The paint looked like it had been cleaned with #1 steel wool. There were a few dings, a pretty good kink in the rear fender, and it needed a bigger tank. I was definitely in for a paint job. In the Peoples' Republic of New Jersey a basic single-color repaint on a Harley costs $1500. If I wanted the 74 cubic inch big-bore kit, and I did, then I was lookin' at the painter in my mirror, as well as the mechanic. When the Good Fairy showed up at my bassinet, she waved her little wand and intoned, "You will be short and wide, but you will keep your hair. You will be a good Infantry boat commander, a middling rider, a decent cabinetmaker, but you will never be any damn good with a paint gun." I come from a time when we did a lot of our own work, for lack of money. We had stickers on our cars that said "Edelbrock" and "Holley." Today's kids have stickers, too. They say "Sony" and "Panasonic." I have had to do some painting, and I'm still no damn good at it, but I have found a combination of techniques and materials that work. A complete thunderbungle probably shouldn't try, but anyone who knows which end of the screwdriver to hit the nail with, and who knows that Bondo isn't a kinky porno site, can paint a bike. I just did it, and (he said modestly), it's freakin' beautiful, better than factory. It has a deep "wet look", and while it has a couple of flaws, no one can see them but me. Trust me, this was not the result of skill! I removed the painted parts from the bike, which can be a pain in the neck on a Sportster. H-D is inclined to pass a wire bundle through a hole, then put a big, clunky connector on the wires that won't go back through the hole. I painted the oil tank, headlight bowl, and ignition module cover (which the Motor Company leaves black). I made inverted "tees" out of 2x8's on which to set the fenders and the tank while I worked on them. (The Harley tank has a deep groove in the bottom.) I'm not going to go into prep here. Just note that without proper preparation it is impossible to achieve a good paint job. There are books on the subject, and a kid on your block knows how. We are going to use lacquer for the new paint job, so find a place that doesn't show, and wet it with lacquer thinner. If the thinner immediately attacks the paint, you will have to strip the pieces, or use a barrier coat (ask your paint supplier). Modern catalyzed Harley paint is two Rockwell numbers harder than Krupp armor plate, and impervious to lacquer. Use lacquer sandable primer, Bondo, spot putty, etc., until your pieces are sanded to #600 and smooth as a gravy sandwich. Now, here comes the heresy! You don't need a $600 gun, air compressor, etc. If you have them, this article ain't for you. You can use a cheap electric gun, spray cans, or pre-vals. (Your automotive paint supplier will have them; they're a glass jar with a propellant can, sort of a do-it-yourself spray can.) You would probably need about six. I used a cheap HVLP gun, which is the best choice, but I did two parts with a pre-val, and the result is the same. Poifect! You will need to rent, beg or borrow a 7" automotive paint polisher, a slow one that will turn down to 1500 RPM or so. The trick is to use lacquer. Half of the cars you have ever owned were painted with lacquer. It's good stuff. The paint supplier will try to sell you urethane or two-part enamel. DON'T! This stuff is great for the very skilled, using top-grade equipment, but if you are reading this article they are not for you. If you get a bad drip with these, it can be a couple of weeks until they harden enough to sand it out. Lacquer hardens in minutes. Also, each coat of lacquer amalgamates completely with the previous coat, so there are no true layers in the finish. If you polish through an enamel clear coat layer you will see a ghostly ring at the "interlaminar discontinuity." (Hate usin' big words like that, have to pay 'em extra.) I use PPG "Duracryl," which is very user-friendly. In any case, use a name brand. You will need a quart of color (the supplier can match your existing color), a quart of clear coat, and a gallon of reducer (thinner). Get the same brand for all three. You will also need a glass one-quart measuring cup, and a couple of empty quart size paint cans with tops from the hardware store. I also purchased some 18" aluminum flashing to practice on. A word here about rags. A buddy, couple weeks back, picked up a rag off the bench, and wiped down his tank and front fender. The rag had embedded metal chips, and scratched hell out of a $3800 paint job. Never touch paint with a rag that is less than perfectly clean. Use only soft, clean terry or sweatshirt material, and throw them away after use. Reusing a rag is really false economy. Safety notice: You need a two-cartridge organic vapor mask, not a paper dust mask. Also, lacquer vapor is explosive. No flames or sparks! The Motor Company sells their re-finish paint in quarts and aerosol cans. I didn't use it, but they tell me it's lacquer. Woodring and Love's 101 Harley Davidson Performance Projects has the part numbers. I'd guess that you would need 3-4 spray cans of color and 4-5 of clear to do a Sporty. I painted in a garage with the doors open. I bent aluminum flashing into a "U" shape, like a mailbox, to practice on (remember to prime it). When I felt like I had the hang of it, I carried each piece on its support block to the painting area, shot it, then took it back inside to dry. You can shoot outdoors if the temperature is above 60 degrees, with no wind. Lacquer dries too quickly to pick up much schmutz, but a leaf or bug can really screw-up a wet part. OK, the rule is 95% of your time is spent in prep and 5% in painting. We is ready! Mix the paint exactly according to the directions, shaking or stirring at every stage, and store the sprayable mix in the paint cans. Mix up about a quart of each. Spray very light coats. When you start thinking, "it needs one more pass" it is time to stop. Wet coats are for professionals. Spray three light coats of color, waiting 30-45 minutes between coats. Blow some thinner through the sprayer between coats, dumping the excess material in the "sprayable mix" can. Remember to stir thoroughly at each step, particularly with a metallic paint. If you get a drip or run, you're spraying way too heavy. It's best to find this out on the practice pieces. Wait about two hours, then sand the drip out with #600, dry. Recoat with color. Don't sand between the color and clear coats. It's OK if the color looks a bit rough or grainy. All the color coats do is provide color coverage. Now for the clear coat. Again, use light coats. Hit the practice pieces to get the feel. Put on about 4-5 light coats, same interval as above. It don't look real good, do it? Not to worry, as long as there are no big drips at this stage, roughness and "orange peel" don't matter. You're looking at the cumulative errors in 8 coats. Wait about six hours, then hand sand the finish dry with #600, no sanding block. You will see a mottled effect where there is orange peel, as you have sanded the high spots, but not the low. Keep wiping with a damp rag, look at the surface, and sand until the finish is a uniform dull sheen. Now, spray on two more coats of clear. It should look a lot better, as you are now looking at the bad news from only two coats. Let the finish harden for several days. I waited four. While you are waiting, make another trip to the paint supplier. You need to get 3M Imperial wet or dry #1500 grit paper and a Meguiar's 6-inch "Soft Buff" foam buffing pad for your polisher. These are wonderful; it is virtually impossible to burn paint with them. Also, get a bottle of Meguiar's "Mirror Glaze #9 Swirl Remover," a very fine polishing compound. Coarser compounds are for professionals. Cut the #1500 paper into small pieces about 4" square and wet-sand the parts with lukewarm water with a little liquid dish soap added. Same drill as above, you will see the mottled effect, sand until it is gone. Keep the area wet, dry it off to see how it's coming. When sanding or polishing, go really easy at edges and ridges. The paper is ultra fine, so this takes awhile. It took me three hours. Now, we buff. This part is almost magical. You must have the parts tied down (I used bungee cord through the bolt holes), or someone who is willing to hold them down for you while being spattered with compound. Otherwise the polisher can throw a part right across the shop, which usually don't do the finish any good. Smear a light coat of the "Swirl Remover" all over the part, then polish with the foam pad at 1500 RPM. Keep the pad moving, and use only light pressure. Have the pad rotating off edges, not toward them. Polish over the entire piece until the compound starts to disappear. Wash the excess off with clear water, and you should see a good shine. Look the part over carefully, in good light. You may want to re-sand and re-buff some areas. Then polish again. I find it takes at least two passes with the compound. At this point, Viola, yer done. You should have a crystal finish. Don't wax for a month or so, to let the lacquer harden. Note: there is so much high aromatic garbage in gas these days that, although lacquer is supposed to be pretty resistant, I am really careful when fueling, and I never fill clear to the top. I fear that something named "Methylated Tributyl Ether" will cut anything. At the top of this article is a picture of my Sportster after being repainted and polished. (See my article The Art of Harley Polishin' for more on the latter.) Go forth and be joyful! |