|
Smith & Wesson .357 Magnum Revolver: Frankengun! By David Tong 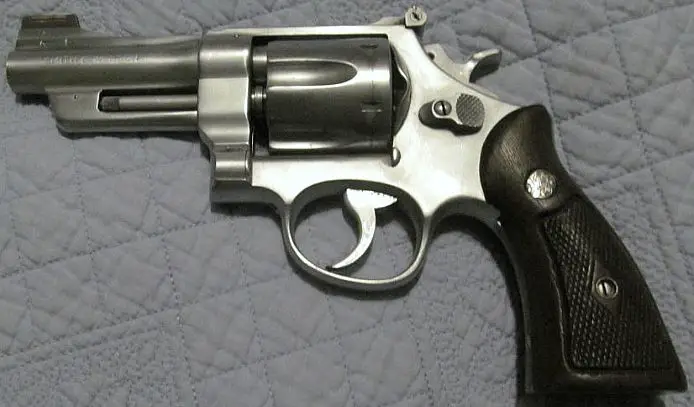 The revolver that is the subject of this article is, in some ways, being resurrected from the dead, just as was Mary Wollstonecraft Shelley's Frankenstein character. Hence, my reference to "Frankengun" in the title of this article. Smith & Wesson introduced the .357 Magnum cartridge in 1935 in its big N-frame revolver. This example was built in early 1952, before the "Smith & Wesson .357 Magnum" revolver was renamed the "Model 27," as it is known today. It has already been around sixty-three years at the time of writing. As I have not obtained a factory letter to determine its original barrel length, finish, or front sight installed, I can but guess. Its prior owners badly neglected this revolver and performed some questionable modifications. The original barrel, which might have been 8-3/8 inches, 6-1/2 inches, 6 inches, or 5 inches, was cut down to its current 4 inch length and finished with a recessed muzzle crown. The front sight base was double-pinned to the barrel forging. The pins were crudely installed and due to poor wheel-polishing the holes are dished. The original front sight has been replaced with a modern encapsulated red fiber-optic type. However, poor installation of that sight, apparently because it was not securely clamped when its retaining pinhole was drilled, means there is a trace of wobble when you grasp it between your fingers and wiggle it. Again, the retaining pin was not properly polished. To add insult to injury, the replacement front sight is too tall, requiring the rear sight's elevation to be nearly maxed out. Fortunately, the rear sight click screw adjustments work satisfactorily. A non-factory, matte industrial hard chrome external finish was applied. The trigger, hammer, rear sight and all other parts were also hard-chromed. There are notable areas of pitting below the chrome and I also found evidence of prior rust and staining under the original walnut Magna grips, as well as on the leaf mainspring. The chrome finish is in fairly good shape and evenly applied. It probably helped prevent any further surface deterioration on what had obviously been a hard-used and neglected sidearm. The sideplate appears to have been polished separate from the frame and it sits a wee-bit lower than the frame surface. The usual S&W logo roll marking on the plate was removed during polishing. All the sideplate screws show just a bit of burring to their slots, easily remedied. The cylinder and barrel throats appear to be in good shape and there is only slight apparent flame-cutting of the top strap above the barrel-cylinder gap. This suggests the revolver was shot mostly with .38 Special rounds. Two of the six chambers are a bit slow timing-wise, and there is some slight end-shake of the cylinder. The ratchet pawls and the advancing hand appear to be in good, non-burred condition, but likely the hand will need replacing to fully correct the timing on the two chambers. The cylinder bolt has a burr on its left forward edge, which might be the reason there were some drag marks on the cylinder. There are a pair of extractor star pad marks on the recoil plate, which indicates that the yoke cylinder may not be providing perpendicular support to the cylinder. Upon measuring the distance to the top strap at the front and rear yoke bearing surfaces, there was a .005 inch declination at the rear surface. The trigger pulls are fine, as you would expect in a revolver of this age. The double-action pull is probably about nine-pounds, while single-action is about 2-3/4 pounds. The DA stroke is linear and smooth, typically 1950s S&W, with no stacking. During my initial tear-down I did not find much dirt or debris inside the mechanism and this was easily cleaned with Slip 200 725 Carbon Cutter solvent and compressed air. As one of the so-called "five screw" revolvers with four sideplate screws as well as one for the cylinder stop detent, they are relatively easy to take apart and work on. Only one fine screwdriver blade and Brownell's rebound slide tool are necessary. I aluminum-oxide blasted the rear sight assembly and black Parkerized it to restore a black sight picture. I also installed a new 13 pound, reduced-power, Wolff rebound slide spring, lightly polishing the slide on three sides, as well as ensuring that the factory stoning of the inside bottom edge was still intact (it was). Some prior polishing was performed, but this time I used worn 240-grit aluminum oxide cloth backed with a file to maintain flatness. Brownell's makes a very handy rebound slide removal/replacement tool that solves much frustration in disassembly and reassembly. I installed a Ron Power Custom ribbed leaf mainspring, left the factory strain (preload) screw full-length and I fully threaded it into place. This screw has often been shortened by unthinking owners to lighten the pull (by reducing spring preload) with the factory spring. In really bad cases I have heard of unreliable ignition as a result, but have never seen it happen. Brownell's supplied the spring kit used on this project, which is sold as a package consisting of the Power mainspring and three different weights (13, 14 and 15 pound) rebound (trigger return) springs. While I had some question about using the lightest of the trio, it works fine and the lighter spring does reduce the double-action trigger pull. A good friend lathe-turned a small piece of round stock to use within the inside diameter of the yoke's hollow cylinder. It was a precision fit, pressed into place with effort. This was used with hand pressure and in conjunction with a 10inch long "breaker bar" to gently and gradually move this tube into correct perpendicularity with the recoil plate. I used the Brownell's yoke facing cutter and two 0.002 inch shims to remove the minor cylinder end-shake. I noticed a small burr on the left side edge of the cylinder stop (bolt) that locks into the cylinder notches. This I gently dressed down with a fine Arkansas stone with oil. I then used a worn Scotchbrite dish pad to polish its curved top, so as not to remove material. I watched the hammer travel rearward in its track while slowly pulling the double-action trigger. While it appeared to run straight and true, I did install one hammer shim bearing at the base of the hammer pin. I also installed two of the appropriate trigger shim bearings to remove a slight amount of side-to-side play in the trigger. The action is now slicker and a bit tighter than before. Although I do not see evident wear on either the extractor star or the hand, the timing is still slightly slow to lock when slowly thumb-cocking the hammer for single action shooting on the same two chambers. At normal thumb cocking speeds, it operates fine. I am unsure whether a later manufacture hand will be usable. If not, it will be somewhat challenging to locate a new older part. I gently wire-brushed the chrome exterior plating to make the revolver look like a factory stainless model, taking heed to leave polishing marks in the same directions as they would have appeared from the factory. This made the light pitting under the chrome stand out even more, although the resulting appearance made several folks think it was a stainless steel revolver. I reassembled using Slip 2000 EXL full synthetic lubricant on all rotating and sliding components. One drop on the hammer and trigger pivot pins, one drop on the sear engagement surfaces, one drop on both the inside of the frame for the rebound slide area and inside the slide's spring tunnel, one drop on the ejector rod, on drop on the cylinder pin, one drop on the yoke pivot inside and outside. Regarding the front sight, I have not decided whether to install a Trijicon dovetailed unit for low-light capability, or simply install another more traditional blade of some kind. I am fond of the fiber optic sight in good light, but question its durability. I believe that an approximately 0.250 inch front sight height would be about right. So far, I have not changed the original checkered walnut Magna grips. For my smallish hands, they allow me to reach the trigger easily and since this revolver does not have anywhere near as much recoil as the .44 Magnums I am more familiar with, there may be no need for more hand-filling grips. The right grip panel could stand to have its checkering re-cut, as it bore the brunt of wear from the undoubtedly right-handed prior owners. Next, a brief trip to the range. Two types of ammunition were used to confirm function and rough zero. These were Remington .38 Special 130 grain full metal case and Hornady .357 Magnum 158 grain JTC factory loads. I found the stock Magna grips comfortable, even with Magnum loads. I was pleasantly surprised by the moderate felt recoil, which is mostly because of the weight of the heavy N-frame revolver. The recoil levels, even with the four inch barrel, felt roughly the same as a .45 ACP service pistol, which is fine by me. A far more disconcerting issue was misfires with both the .38 ammo and, to a lesser extent, with the .357 ammo. Since I have never experienced misfires in any of the S&W revolvers I have previously owned, it left me scratching my head. By careful observation, I was able to isolate one chamber where misfires occurred. The next step will be to install a new firing pin, possibly followed by a full-power factory mainspring. Frankengun remains a project; to be continued. |