|
Segway Reticle Leveler Mk. III By Rick Ryals and Chuck Hawks 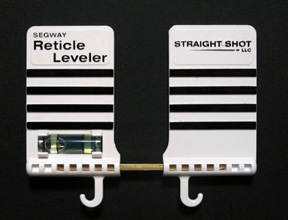 Most of us have mounted telescopic sights on our rifles. Given even a modest amount of hand skills it is not a difficult task. However, one part of it that can cause frustration is getting the reticle level with the rifle. The vertical cross wire should point down through the center of the bore. Otherwise, the scope is canted and the rifle will be shooting from one side to the other, a problem that becomes more noticeable as the range increases. We have discovered a handy, inexpensive little tool to solve this problem. It is called the Reticle Leveler and is made in the USA by Straight Shot, LLC (http://www.straightshotllc.com/). The current version is the Mk. III. It is produced under the auspices of James Palmer, nephew of the designer. The Segway Reticle Leveler was off the market for a while, but is back by popular demand and improved in a couple of minor ways. First, the bubble level, which is there for reference--you don't normally have to use it to level your scope, is now snapped-in. Second, the alignment lines on the "B" side are narrower, while the lines on the "A" side remain bold. Use whichever side is easiest for you to align your reticle. The reticle leveler consists of two rectangular, white plastic wings connected at the bottom with a square brass rod. One of the wings contains a bubble level. The plastic pieces have four black horizontal stripes about 1/8" wide, spaced about 3/16" apart on side "A", while the flip side has eight stripes about 1/16" wide. There are hooks at the bottom for attaching the supplied elastic band to hold the Reticle Leveler steady against the flat top of the rifle's scope base when in use. The elastic band wraps around the bottom of the rifle. 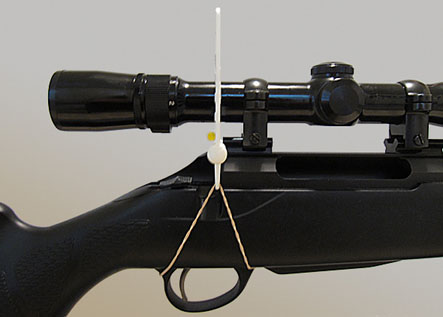 During the scope mounting process, leave the rings loose enough that you can move the scope against some friction. Set the scope's eye relief to suit you then place the rifle on a rest. Pull the reticle leveler apart and slide the brass rod between the top of the mount and the bottom of the scope. Slide the wing back on and push the wings together until they touch the scope. Hook the rubber band from one side, underneath the rifle, to the other side. This will hold it steady while you level your scope. Now look through your scope. The black stripes on the reticle leveler provide a reference with which to align the scope reticle. Turn the scope slowly until the reticle aligns with the black stripes. When the scope is level, tighten the ring screws slowly, alternating sides. Check the reticle frequently to make sure the scope is not turning as the screws are tightened. Once the rings are tight, make a final check to ensure that the scope is still level and you are good to go. Your scope is now mounted square with the axis of your rifle. Once you've used it, you won't want to mount a scope without using a Segway Reticle Leveler to prevent canting. |