|
Sharpening Convex Ground Knives By Gary Zinn  There are six distinct blade grinds normally used on knives. Four of these, including the flat, sabre/scandi, double (a.k.a. compound) and chisel grinds, use a flat surfaced primary grind to reduce the sides of a knife blade from its full thickness to a cutting edge. In the majority of factory sharpened knives, the primary grind is done to the point that a rough edge is formed and then a narrow micro bevel is used to form the final cutting edge. (A micro bevel is not used on true chisel ground blades.) Hollow and convex ground blades are different. A hollow ground blade is so-called because the primary bevel is machine ground as a concave surface in the sides of the blade. The hollowed out surfaces on each side of the blade are normally cut to a rough edge, with a micro bevel used to form the sharpened edge. A convex ground blade has a curved bevel, formed by each side of the blade being ground in a shallow arc to the cutting edge, with no micro bevel added. The convex grind is not common on normal production knives, for it is not as easily machine formed as the other grinds. Some custom and high end production knife makers use it, as do some expert sharpeners, so it is unusual, but not really rare. It is the most difficult of the six basic grinds to execute well and requires a unique set of tools and techniques if one is hand sharpening at home. My purpose here is to explain the nature of the convex grind and note the simple tools and subtle techniques needed to execute it on cutting blades with freehand manual sharpening. Sharpening using power tools is beyond the scope of this article. The Convex Grind Illustrated I have already characterized a convex ground blade as having a curved bevel, formed by each side of the blade being ground in a shallow arc to the cutting edge. Here is an illustration. 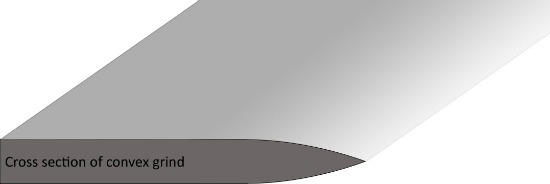 Note that the blade has its full thickness for the majority of its width, then curves in symmetrical arcs on each side to the cutting edge. Short, more pronounced arcs will create a sturdier cutting edge, while longer, shallower arcs will produce a keener edge. The arcs used on a particular blade are a judgment call by the knife maker, based on the intended uses of the knife and the appropriate tradeoff between edge keenness and durability. Here is an illustration (below) of how a convex grind may be formed. Starting with a blade on which a V-shaped primary bevel has been cut (top image), the convex bevel is formed by grinding the flat beveled areas into arcs. This involves grinding an arc both behind the blade edge (second image) and at the shoulders of the original flat bevel (third image). When the arcs have been cut enough to erase both the original angled shoulders and the straight beveled planes behind the edge, the result is a smoothly curved bevel that runs from the full thickness of the blade to the sharpened edge (bottom image). 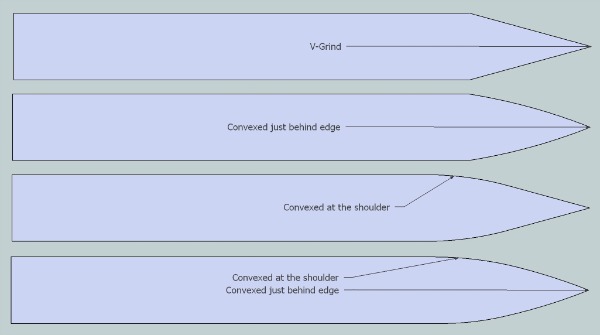 It is not obvious from the illustration, but forming a convex bevel from a straight V-bevel sets back the edge a bit. This happens because the original edge must be cut back to form the arcs behind the edge. Basic Tools and Techniques Bench stones and other tools used to sharpen plane beveled knife blades do not work on convex bevel blades. This is because the curved bevel surface cannot be worked properly with tools designed to work on flat surfaces. Fortunately, the tools needed to sharpen convex beveled blades are simple and inexpensive. I will introduce them by starting with the simplest scenario, maintenance or touchup sharpening of a slightly dull knife. Touchup sharpening: Suppose we have a knife that has dulled slightly, say from Very Sharp (VS) to Sharp Enough (SE). (See the Addendum for an explanation of degrees of sharpness.) To touch up a convex bevel edge that is still good, but could be better, nothing more is needed than a double sided leather hone (paddle strop) and two small sticks of sharpening compound. The leather strip on one side of the paddle-shaped base is loaded with the black sharpening compound, while the leather on the other side is treated with the green compound. A slightly dulled knife edge is sharpened via a simple two step procedure. First, backstroke the blade across the side of the hone with the black sharpening compound, using as many alternating strokes on each side of the blade as seem needed to refresh the cutting edge. Next, do the same using the side of the hone with the green compound. Usually no more than about a dozen strokes on each side of the leather hone will do the job on a knife that is not seriously dulled. The leather strips, treated with sharpening compound, are the key to correctly sharpening convex ground blades. The leather has some give, so slight downward pressure, applied as the blade is stroked across the leather, will cause it to compress and conform to the curved surface of the knife bevel. As the blade is drawn across the leather, the sharpening compound removes minuscule amounts of steel from the surface of the bevel, thus refreshing the edge. The black compound is more gritty than the green, which is why sharpening starts on the black side of the hone and is then finished on the green side. Correct blade angle and pressure make for effective and efficient sharpening with the leather hone. To get the correct sharpening angle, I set the knife edge on the leather, at a higher angle than I know it should be. Then, I rotate the blade downward, feeling the bevel rock on the leather until the edge just BARELY clears contact with the hone surface. This is the angle I want to maintain as I stroke the blade across the hone. The blade angle also may be set by laying the blade flat on the hone, then rotating it until the edge just brushes the hone surface. Use whichever method gives you the better feel for the sharpening angle. Now, correct pressure comes into play. Apply enough downward pressure on the blade to bring the edge back in contact with the hone surface, but no more. Finesse beats force here. If I apply too much pressure, the compressed leather will rebound upward against the edge as I draw the blade across the hone. This is not good, because it will actually round the edge enough to keep it from getting as sharp as possible. This is important and bears repeating: apply only enough downward pressure on the blade to make the edge just skim across the surface of the hone. Any more pressure than this is counterproductive. As the blade is backstroked across the leather surface, it must also be rotated to follow the curve of the cutting edge. Strokes should be deliberate, rather than rapid, both to better maintain the desired pressure and contact between the blade and the leather, and to control the turning of the blade to sharpen the curve and tip. Incidentally, I use heel to tip sharpening strokes (by long habit), but stroking tip to heel works just as well. As an aside, here is an old trick that can help if you have trouble finding the correct sharpening angle. It involves marking the bevel area to be sharpened with a felt tip pen. The procedure is explained on the Buck Knives website (paraphrased here): Use a black felt tip pen to shade in the bevel of the knife. Then take a few strokes on the leather hone and examine the edge. If you have maintained the proper angle, all the black will be gone. If you see black on the top of the bevel it means you are holding the back of the knife too far from the hone (sharpening angle is too high). If there is black on the cutting edge but the top of the bevel is clean, then you are laying the knife too flat on the hone and you need to raise it a bit. Remark the edge and try again. Once you discover the correct angle, maintain it. My father taught me to sharpen knives on a bench stone before I was seven years old. He stressed always being aware of the feel and sound I was getting as I worked a knife on a stone, because these provide a lot of feedback on how well the sharpening technique is being executed. Feel and sound is just as important when a convex beveled blade is being sharpened. It is hard to describe the correct feel and sound in words, but I definitely know when I am doing it right, or if I am doing something wrong. I believe any experienced freehand sharpener will understand what I am saying. Correct technique comes from practice and experience. Anyone new to sharpening convex ground blades should pay meticulous attention to proper technique. As you gain experience with convex bevel sharpening, the technique will become natural. In the meantime, be patient and keep working at it. Sharpening a badly dulled knife: A convex bevel knife that has been dulled to Not Sharp (NS) condition needs more work than can be efficiently done on a treated leather hone. The good news is that the only additional tools needed to do the job are some fine grit sandpaper, a computer mouse pad (or something similar) and a thick book. You can get by with three grits of sandpaper, 400-600, 1000-1200 and 2000. The 400-600 grit is needed only if very heavy grinding is necessary, say if some small nicks or chips must be worked out of an edge. A badly dulled, but undamaged, edge can usually be sharpened by working the blade on 1000 or 1200 grit paper, followed by smoothing and refining the restored bevel and edge on 2000 grit paper. The goal is to get the knife back to SE condition, after which the treated leather hone can be used, as described above, to get it all the way to VS or ES. I recommend that name-brand wet/dry sandpaper be used. Wet/dry paper generally has better backing and adhesives, plus more consistent grit sizing, than generic dry sanding paper. In addition, wet/dry paper is needed if one wants to use some water during sharpening. Wet grinding is not necessary, but I do sometimes spray a little water on 2000 grit paper when I feel that doing so will improve the bevel smoothing and edge defining that I am trying to accomplish at this stage of sharpening. Do not soak the sandpaper; just dampening the surface with water from a small spray bottle is sufficient. A compressible backing is mandatory when sandpaper is being used, for the same reason compressible leather is used for honing convex grind blades. A frequently recommended backer is a computer mouse pad, but not just any pad will do. The pad must be somewhat flexible and moderately compressible, and must be at least 3/16 inch thick. Thin, rigid mouse pads are no good. I think that mouse pads are routinely recommended because of their ready availability. I have used various backers over time, and anything works that has the right flexibility, thickness, and compressibility. Recently, I tried a non-abrasive household scrubbing pad, specifically a 6x9x1/4 inch Scotch-Brite pad. It worked fine, much like the mouse pad I have used for some time. The book serves as a raised platform for the sandpaper and backer. It should be thick enough to give finger clearance above the counter or table on which you are working. In summary, if a knife is too dull to easily sharpen on a leather hone, break out the sandpaper and backer. Start with whatever grit paper seems appropriate (400-600 or 1000-1200) and work the blade until the bevel is refreshed and a new rough edge is formed. Smooth the bevel and refine the edge on 2000 grit paper, until the blade reaches SE condition. Then, switch to the leather hone and proceed as outlined under "Touchup sharpening" above, until the edge improves to VS or ES condition, as desired. Just to be clear, the same sharpening angle and pressure guidelines apply to sharpening on sandpaper as were outlined for sharpening on treated leather hones. Where to Find Tools and Instructional Videos Leather hones and sharpening compound are available from a number of sources; here are two examples. Garos Goods (www.garosgoods.com) has a nice selection of paddle strops and sharpening compounds. KnivesShipFree (www.knivesshipfree.com) offers a two-sided paddle strop, with or without black and green sharpening compound. (Look for strops with 5/32 inch or thicker leather.) KnivesShipFree also sells a complete convex sharpening kit, which includes compound, a leather hone, and plenty of sandpaper, in five grits. Everything comes in an "otter box," which serves both for storage and as a work surface. I have one of these and it is a convenient, turnkey kit. However, the leather hone is not very large, so it works best on shorter blades. Some who do a lot of convex bevel sharpening like to make their own bench hones, by attaching strips of heavy leather to wood bases. Jantz Supply (www.knifemaking.com) is a good source of leather for making bench hones. For instance, they list 12x12 inch vegetable tanned leather in 9-10 ounce weight. This leather would make excellent bench hones, after being treated with black and green sharpening compound. There are numerous how-to sharpening videos on YouTube, some of which are devoted to sharpening convex bevel knives. Some are good, others are bad, and too many are just plain ugly (unsuitable tools and/or bad technique). KnivesShipFree provides a link to a series of short videos that break down the overall topic of convex bevel sharpening into focused segments. There are 11 videos in the set, which all together run about 28 minutes long. These videos all feature a narrator/demonstrator who takes a no-nonsense, easy to understand approach to the various topics covered. Comparing these videos with several others on YouTube, I concluded that this set provides the essential show-and-tell information one needs to become familiar with convex bevel sharpening, in easy to digest bites. There is a tab at the bottom of the KnivesShipFree web page that links to these videos. Conclusion Convex bevel knife sharpening involves a unique set of tools, with techniques and nuances that are a bit different from those involved in manual sharpening of other blade grinds. However, once one understands what tools and techniques to use, convex bevel sharpening is really not mysterious, nor is it prohibitively difficult to do. It is just a different form of freehand knife sharpening. Addendum: Sharpness Defined I have a qualitative ranking system for describing the sharpness of knives:
Here is a simple method I use to evaluate the sharpness of a knife and what I mean by these degrees of sharpness. To test sharpness, I use a magazine or catalog with pages of thin coated paper. I pick up a page or two, punch the tip of the blade through the paper just below where I am holding it by the outside edge, and slice downward through the page(s). If the paper does not cut cleanly, then the knife is Not Sharp. If the cut is clean, but with noticeable resistance, then the blade is Sharp Enough. A clean, easy cut with little resistance indicates a Very Sharp blade, and if the knife zips through the paper with virtually no resistance it is Extremely Sharp. This is a quick and consistent method of evaluating blade sharpness. NS means that some sharpening work is needed before the knife can be efficiently and safely used. SE means that the edge is acceptable for doing normal cutting tasks. When I sharpen a knife, I generally aim to get it to VS condition. It will easily cut almost anything that should be cut with a knife and I will likely be able to use it for quite awhile before a touchup is needed. Extremely Sharp is my term for a knife that most people would call razor sharp or shaving sharp. I do not use these terms; for to me they apply to razor blades, which are quite different from normal knife blades. I do not normally sharpen knives to ES condition, mainly because it requires extra work to get an edge to this keenness and it will usually dull back to VS condition very quickly. I will occasionally hone a special purpose blade, such as a Wharncliffe, to ES if I need to use it for fine work (e.g., cutting stencils or such). My opinion is that generally a knife should be sharpened to VS condition. Then, whenever the edge falls back to SE condition, it should be touched up at the first opportunity. This makes for a much easier sharpening job than if one lets a knife dull to NS condition before resharpening. |