|
Sighting-In a Rifle for Maximum Point Blank Range By Gary Zinn At Guns and Shooting Online, we believe the best way to sight-in hunting rifles is to use the Maximum Point Blank Range (MPBR) approach. Those of us who write shooting and hunting articles for G&S Online mention and apply MPBR frequently, but it occurred to me that we may not have sufficiently and comprehensively explained the what, why and how of sighting-in a rifle to shoot to a given MPBR with a particular cartridge load, and then taking hunting shots within the range parameters of the load in question. MPBR in a nutshell - What and Why G&S Online Senior Editor Randy Wakeman has succinctly described the MPBR concept as follows: "Briefly stated, a 'six Inch maximum point blank range' allows you to aim at the center of the heart/lung area of your targeted big game animal and your bullet's trajectory does not exceed three inches high or three inches low during its flight to target. Three inches above or below the point of aim is peanuts and will result in a killing shot on even the smallest big game animals without adjusting for bullet drop." (From What is Maximum Point Blank Range Hunting?) I tumbled to the MPBR concept over a quarter century ago and have used it to sight-in my hunting rifles ever since, so the Randy Wakeman quote is perfectly clear to me. In case it is not as clear to someone less familiar with the concept, here is another way of understanding what happens when a bullet is shot from a rifle sighted-in for a given MPBR. Suppose I have a .308 Winchester rifle that I wish to sight-in to shoot a 180 grain hunting load to a +/- 3-inch (6-inch target diameter) MPBR range. Assume that the muzzle velocity (MV) of the load, fired from my rifle, is 2540 f.p.s. and the conventional (G1) ballistic coefficient of the bullet is 0.425; also, the line of sight of my scope is 1-1/2 inches above the center line of the rifle bore. This is all the information I need to calculate the MPBR and bullet trajectory parameters of the load, using online point blank range and ballistic trajectory programs. The graph below shows the results of the MPBR and trajectory analyses visually. Here are the key results. Reading left to right, the left margin of the graph shows that the bullet exits the rifle muzzle 1-1/2 inches below the line of sight (depicted by the horizontal line across the graph, at zero inches). Between 22 and 23 yards downrange, the bullet first crosses the line of sight, from below--this is called the Near Zero. Next, the bullet is 2.84 inches above line of sight at 100 yards, which is the 100 yard sight-in elevation. The bullet reaches its apogee, 3 inches above line of sight, at 120 yards. Next, the bullet crosses the line of sight, on a downward path, at 213 yards, which is called Far Zero. Finally, the bullet drops to 3 inches below line of sight at a range of 250 yards. 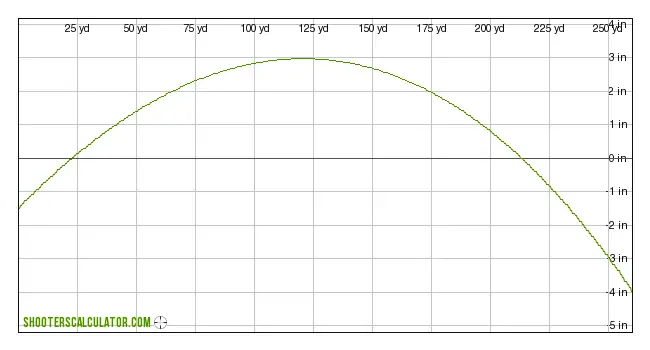 To summarize, the +/- 3 inch MPBR for this load, shot from this rifle, is 250 yards, with a Far Zero range of 213 yards and a 100 yard sight-in elevation of 2.84 inches. MPBR, Far Zero, and 100 yard sight-in elevation are the three critical parameters that must be known to sight-in a rifle and load using the MPBR concept. This explains what is sighting-in a rifle for the MPBR of a particular load. Now, I can explain why to do it. Simply put, with the rifle so sighted-in, one can target a game animal at any distance, out to the MPBR range, simply by aiming at the center of the vital zone. Referring to the example just developed, a well executed shot would hit no more than 3 inches above the aiming point at 120 yards, and no more than 3 inches low at 250 yards. What could be simpler for the hunter? Chuck Hawks sums up the practical utility of the MPBR approach as follows: "Forget about bullet drop tables, 'ballistic' scope reticles and so forth. In fact, in the field, forget about long range shooting entirely. Zero your rifle or handgun for the +/- 3 inch maximum point blank range (MPBR) of the cartridge/load you are using and NEVER attempt a shot beyond that distance." (From The Personal Range Limit.) The "never attempt a shot beyond MPBR distance" part of this statement refers to hunting game animals. Varmint hunters may be inclined to take shots beyond the MPBR range of the cartridge and load being used, but they will have to cope, one way or another, with the rapid bullet drop that will happen beyond the MPBR of their loads. Personally, I agree with Chuck Hawks that the MPBR range of a big game load should be treated as an absolute extreme range limit (closer is always better). Conversely, I have no problem, in principle, with the idea of taking shots at varmints at distances beyond MPBR. One more "what and why" issue that needs to be addressed before moving on is target diameter. The most used MPBR target sizes are +/- 3 inches (6 inch target diameter), for deer and similar size game animals, and +/- 1-1/2 inches (3 inch target diameter), for most varmint hunting. Other reasonable target sizes for game animals are discussed in Randy Wakeman's article cited above. Personally, I am good with the target sizes just noted for big game and varmint rifles, respectively, but one can use any target size deemed appropriate for the particular quarry. (A +/- 4 inch MPBR might be chosen for rifles used only to hunt Class 3 animals, for example.) How to sight in a rifle for MPBR Here is a step-by-step guide to sighting-in a rifle, to shoot a particular load to a specified MPBR. I will use the latest sighting-in I did as an actual example of the process. Step 1: Choose load, specify +/- trajectory and do the math Two deer seasons ago, I loaned my eldest nephew my bolt action .260 Remington deer rifle, for one of his grandsons to use for his first deer hunt. I had the rifle sighted-in for a 129 grain reload I had developed, but I only had a few rounds of that ammo on hand. I bought two boxes of Federal Fusion ammo with 120 grain SP bullets for use during the coming hunt. I did not have time to test the new load in the rifle before I had to get it to my nephew, but I felt that the commercial load would shoot close to where I had the rifle sighted-in for my reload. (I provided notes on how the rifle was sighted-in for the reload, which was +/- 3 inch MPBR at about 270 yards.) Long story short, the boy and his father both got deer with the rifle, making one-shot kills in both cases. Good stuff! I decided to sight in the rifle for the new load, so I reclaimed the rifle, bought some more ammo for it and went through the process of adjusting its MPBR for the Federal Fusion load. Now to the specifics of Step 1. I am going to sight-in the rifle for the Federal Fusion 120 grain SP commercial load, with a +/- 3 inch MPBR. Federal claims the muzzle velocity of the load is 2950 f.p.s. (from a 24 inch barrel) and that the bullet has a BC of .390. With one caveat, this is all the information I need to calculate the MPBR and related parameters for the load, and develop a trajectory table to refer to while sighting-in the rifle with the selected load. The caveat is that my rifle has a 22 inch barrel, while the stated MV of the load is from a 24 inch barrel. This difference needs to be addressed, for the MV of the load, shot from a 22 inch barrel, will likely not measure up to the stated MV from a 24 inch barrel. What to do? The precise way to establish the MV of the load from my rifle is to chronograph it. Unfortunately, I do not own a chronograph and a fellow member of my shooting range, who I knew had one, was away on a turkey hunt at the time. I went to Option B, which was to do a rule-of-thumb estimate of the MV of the load from my rifle. In The Rifle Barrel Chuck Hawks cites two independent sources that agree, for loads with a stated MV between 2500 and 3000 f.p.s. (for a specified barrel length), the change in MV will be approximately 20 f.p.s. per 1 inch change in barrel length. MV will usually increase in longer barrels, decrease in shorter ones. Applying this rule of thumb to the case in point implies that the MV of the Federal Fusion load, fired from my 22 inch barrel rifle, should be about 2910 f.p.s., or 40 f.p.s. less than it is claimed to be from a 24 inch barrel. Therefore, I used a MV of 2910 f.p.s. as a basis for the rest of the trajectory analysis. This difference in MV is not going to have a great effect on trajectory, but I wanted the analysis to be as accurate as possible. (Later on, my friend chronographed the load for me. He got an average MV of 2898 f.p.s. from my rifle. This 12 f.p.s. difference from my rule-of-thumb estimated MV implies a 1 yard difference in MPBR and a 0.02 inch difference in 100 yard sight-in elevation, which is truly a distinction without a meaningful difference.) Having cleared the MV hurdle, I was ready to crunch some numbers. I routinely use the programs on the shooterscalculator.com website to do MPBR and trajectory analyses. Entering the BC (.390) and MV (2910 f.p.s.) for my load into the Point Blank Range calculator, specifying a target size of 6 inches (+/- 3 inch MPBR), and using the default sight height of 1.5 inches, the program returns a MPBR of 282 yards, far zero of 241 yards, near zero of 25 yards and 100 yard sight-in elevation of 2.66 inches. (If you use this program, be aware that it takes a few seconds to return results; give it time to do its thing.) Turning to the Ballistic Trajectory calculator, I entered the bullet BC, weight and MV, along with the 241 yard far zero range returned by the point blank range calculator. There are several other parameters that can be user set (altitude, temperature, etc.); I left these at their default values, including the 1.5 inch sight height. I set the "chart range" to 285 yards, and the "chart step size" to 1 yard. Running the program revealed the near zero of the load is 26 yards (actual bullet elevation 0.01 inch), 100 yard sight-in height is 2.66 inches, bullet apogee is 3 inches at 135 yards, 200 yard bullet elevation is 1.92 inches, far zero is at 241 yards and the bullet elevation is -2.97 inches at 282 yards. Here is a chart of this bullet trajectory. 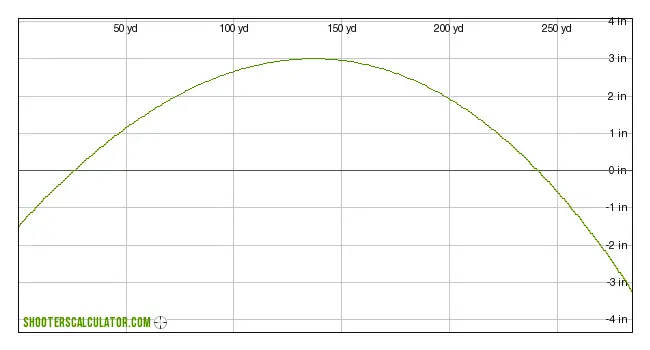 Step 2: Bore sight and close zero the load This step is, generally, necessary only if one is sighting-in a new rifle/scope combination. If simply sighting-in for optimum MPBR of a different load from one used previously (as was my situation), skip to Step 3. I will not go into procedural detail about this step, because I expect that most readers know the drill. (See How to Sight-In a Hunting Rifle for details.) I will just say that the objective here is to adjust the sight so that shots will hit as close as possible to the bullseye of a sight-in target at 25 yards. 25 yards, plus or minus a couple of yards, is the near zero range of most modern high or medium intensity rifle cartridges. Getting the rifle close zeroed at 25 yards will put initial 100 yard sight-in shots comfortably on paper and sometimes near the desired elevation and windage, in Step 3. It is worth noting that one should choose days with moderate temperatures and calm winds to do the range work described in Steps 2, 3, and 4. Doing the sighting-in and test firing under benign conditions helps minimize erratic shooting results. Plan for an all day project, or spread it out over two or three range sessions. Step 3: Sight in the load at 100 yards This is the critical step in the process. Accordingly, it is the one that should take the most time, patience and attention to detail; not to mention the most ammo expended. Again I will not suggest a particular procedure. Ask a dozen shooters how they do a 100 yard sight-in and you are likely to get twelve responses that differ in the details.) I will say that a solid bench rest setup and easy to see and measure sight-in targets are essential. In addition, a good spotting scope is great to have, if not an absolute necessity. Again, refer to the article "How to Sight-In a Hunting Rifle" for some key tips on sighting-in procedures and techniques. The first shots fired at 100 yards are to verify where the rifle, as sighted-in to this point, is shooting. As I already noted, I did not bore sight and close zero my rifle; rather, I started my sighting-in process by carefully taking a handful of test shots at 100 yards, to see where the rifle was grouping the new load with the existing sight settings. This turned out to be about 2-7/8 inches high and 0.2 inches left. In Step 1, I found that the optimal +/- 3 inch MPBR for this load calculated to a 100 yard sight-in height of 2.66 inches. I needed to lower the sight 1 click (1/4 m.o.a.) to get the elevation at or very near 2.66 inches; windage would be improved by a 1 click adjustment to the right. I made these sight adjustments and then settled in to carefully shoot a series of 3-shot test groups. I shot 17 rounds in total, including two extra shots to compensate for fliers. I measured the groups, using a ruler with a 1/10 inch scale. The five groups averaged 2.63 inches in elevation, only 0.03 inch below the calculated optimal 100 yard elevation. In addition, these groups averaged 0.08 inch right of vertical. There were no further scope adjustments I could make to get closer to optimal, so my job was almost done. A reassuring result from shooting the 100 yard test groups was that they indicated the Federal Fusion load is quite accurate in my rifle. The five groups averaged 1.1 inches in size. Step 4: Verify trajectory at longer ranges I strongly believe that one should verify a sight-in at longer ranges, whenever possible. My shooting range has a 200 yard target board on the bench rest range, so after completing my 100 yard sighting-in, I turned my attention there. I fired four 3-shot groups at 200 yards, which averaged just under 2 inches high and a scant 0.2 inch right of vertical. The load shot where I expected it to at 200 yards. My experience is that, generally, the results of shooting test groups at 200 yards are very close to what the trajectory table indicates they should be. Occasionally, test groups shot at that range will be off enough to prompt a one click adjustment (1/2 inch change at 200 yards) in the elevation or windage of the scope. It would have been interesting to shoot some groups at MPBR range (280 yards), but I do not have access to a range that long. Nothing lost, really, because I am disinclined to attempt hunting shots at more than 200 yards, and closer is always better. The bottom line is that the only way to be sure how a particular rifle, load and shooter will interact to place bullets at any given distance downrange is by shooting. There is no substitute for trigger time to verify and gain confidence in how your rifle shoots particular loads at various ranges. This is especially important for the hunter, because shooting positions, accuracy and consistency in the field are very different from sighting-in and test firing from the bench. The article The Personal Range Limit is especially instructive on this point. Step 5: Write notes Anyone who has never forgotten how they have a rifle sighted-in, please stand up. Okay, liars, you may sit down. Seriously, do not trust the details about how you have a rifle sighted-in for a particular load to your memory. I have a small notebook in which I keep records of how I have my rifles sighted in; this lives in my range gear box. Also, I make note cards on the sight-in details for my hunting rifles. I put these cards in zip lock sandwich baggies and tuck them in the carrying cases for the rifles in question. Whatever note keeping system you prefer, use it whenever you sight-in a rifle. Some thoughts on ballistic programs Back in the day, my first experience with computerized ballistic programs was a now obsolete Sierra Bullets program, on a CD. Today, there are a bevy of on-line programs available. I have test driven several of these, but my go-to ballistics programs are those on the Shooters Calculator website. This site includes the Point Blank Range and Ballistic Trajectory programs I used to generate the data cited in this article, plus Recoil and Bullet Kinetic Energy calculators that I find useful from time to time. The only program I use with any frequency that is not available on this site is a bullet sectional density calculator; the Beartooth Bullets website has a good one. I have already covered the essentials of using the Shooters Calculator Point Blank Range calculator (Step 1, above). Here are some basic notes on using the Ballistic Trajectory calculator. The key variables: conventional (G1) bullet BC, bullet weight (grains) and MV (f.p.s.) are entered, along with the desired zero range (far zero). The program is set up with a default sight height of 1.5 inches, which can be changed for a higher or lower scope mount. The "chart range" can be set for whatever total yardage is appropriate for a given data run. The "chart step size" can be set to show external ballistics in 1, 5, 10, 20, 25, 50, or 100 yard increments. There are also a set of changeable parameters for shooting angle, wind speed, wind angle and ambient shooting conditions (altitude, temperature, barometric pressure, humidity). I leave these at their default values, unless I have a particular reason to change and evaluate the effects of any of them for a particular analysis. After entering load-specific data and resetting any other relevant program parameters, click on the "create chart" box, then scroll down to see the results. Output includes both a graph that shows the bullet trajectory, over the yardage range specified, and a table that lists bullet elevation and windage at whatever "chart step size" increments have been specified. Elevation and windage are shown in inches, MOA and MIL. Bullet energy and velocity are shown at each range increment, as well as flight time to each distance. If there are any other external ballistics variables that are important when evaluating hunting loads, I do not know what they are. Conclusion There is nothing especially mystical or complicated about MPBR sighting-in of a rifle. Hopefully, this article provides all of the essential information needed to guide a shooter through the process. Again, we at G&S Online hold that MPBR sight-in is the best way to do the job, especially for hunting rifles. Note: A topic not dealt with in this article is, Sighting in a Rifle to Shoot Different Loads." This is addressed in the companion article with that title. |