|
Wheeler Engineering Professional Reticle Leveling System 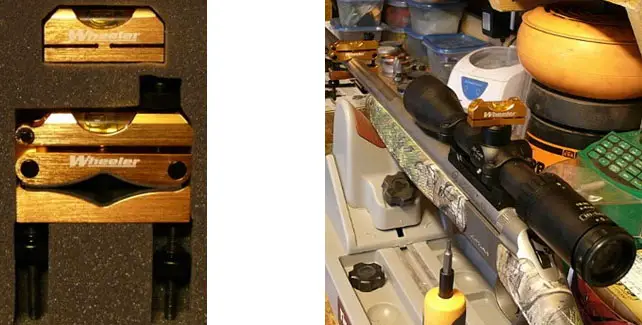 For years we pretty much mounted our scopes the old fashioned way, setting our rifle between two sandbags to level it out, placing the scope in the rings and using our eye to "level" the horizontal bar of the reticle and then adjusting the vertical component until it was perpendicular to the axis of the rifle. While it worked, it was time consuming and not always perfect. Since that time, several inexpensive reticle leveling systems have come on the market that work well for the average shooter who mounts only one or two scopes a year. However, for professionals who set up scopes for paying customers, a faster and more accurate system is required. Wheeler Engineering designed their Professional Reticle Leveling System with dealers and gunsmiths in mind (and folks like us who like neat time-saving tools). What is nice about this system is that it can be used on any type of firearm: bolt action, falling block, pump action or semi-automatics, including AR platforms. We set a new test rifle (CVA Optima V2) into our Tipton Gun Vise (G&S Review: www.chuckhawks.com/tipton_wheeler_review.htm). The Tipton Vise is one of the handiest tools you can have on your reloading bench. It securely handles just about any rifle or shotgun made. You might have trouble with a Barrett M82A1 50 BMG, but for conventional sporting firearms, the Tipton vise works perfectly. Mounting a scope, making repairs or cleaning your gun is easy if you have this device. However, we digress; this article is about the Wheeler Engineering Professional Reticle Leveling System. The instructions for the Professional Reticle Leveling System (PRLS) are so simple that rather than paraphrase them, we decided to simply quote them, as follows: "The system is comprised of two machined aluminum level housings calibrated to their integrated levels. The Barrel Clamp Level is attached to the gun's barrel while the smaller Reference Level is placed on scope base, bottom half of a ring or other flat surface perpendicular to the vertical axis of the gun. The gun is then rotated until the Reference Level is aligned. The tuning adjustment knob on the Barrel Clamp Level is then turned until its level is centered to match the Reference Level. At this point the Barrel Clamp Level is calibrated to the guns axis. The scope can be installed loosely and the Reference Level placed on top of the scope's turret cap. The scope is rotated until the Reference Level is aligned with the Barrel Clamp Level and then simply secured in place." It is that fast and simple! It took more time to torque the rings down with my F.A.T. wrench than it did to level out the reticle on the new scope. Given the fact that we change our scopes around a lot during the course of a year, I believe that we will keep the PRLS. With a 2013 MSRP of $64.99, it is not cheap. However, given its precision, quality and the ease of operation, it is a fair price for the guaranteed accuracy of the results. After all, what good is a three or four hundred dollar scope if it is not properly mounted? |