|
Touchup Sharpening
by Gary Zinn How to sharpen a knife can be a complicated subject, with many variables and options in play. The way one goes about sharpening a particular knife depends on how dull is the blade, whether the edge is damaged in any manner, and how resistant the steel is to grinding. Other factors may apply sometimes, but to me, these are the most important things to consider in deciding how to sharpen a given knife. The focus of this article is what I call touchup sharpening, which works for knives that are not yet so badly dulled that they cannot be used effectively and safely, and which have no significant cutting edge damage. Given these conditions, the tools and techniques to be described work like a charm on “common” blade steels, and are also effectively on most of the modern “super steels,” though sharpening those may require more time and patience. Everything that follows applies to plain edge blades. Sharpening serrated knives is a whole different problem, which I will not delve into here. Before getting into tools and techniques, I need to explain how I define and assess degrees of edge sharpness. This is important to understanding when one can and should do touchup sharpening. Assessing knife sharpness I have a qualitative ranking system for describing the sharpness of knives: NS (not sharp) SE (sharp enough) VS (very sharp) ES (extremely sharp) Here is a simple method I use to evaluate the sharpness of a knife and what I mean by these degrees of sharpness. I use a magazine or catalog with pages of thin coated paper. I pick up a page or two, punch the tip of the blade through the paper just below where I am holding it by the outside edge, and slice downward through the page(s). If the paper does not cut cleanly, then the knife is Not Sharp. If the cut is clean, but with noticeable resistance, then the blade is Sharp Enough. A clean, easy cut with little resistance indicates a Very Sharp blade, and if the knife zips through the paper with virtually no resistance it is Extremely Sharp. NS means that some sharpening work is needed before the knife can be efficiently and safely used. Sharpening a blade in this condition is not really a matter of touchup sharpening, as I use the term herein. I will revisit the issue of dealing with a NS knife near the end of this article. SE means that the edge is acceptable for doing normal cutting tasks, but will not cut as efficiently as a sharper edge. A knife that has dulled to SE condition is ready for a touchup sharpening. So when I sharpen a knife, I aim to get it from SE to VS condition; then it will easily cut almost anything that should be cut with a knife and I will likely be able to use it for quite awhile before a touch-up is needed. Extremely Sharp is my term for a knife that most people would call razor sharp or shaving sharp. I do not use these terms, because we are talking about knives, not razors. I do not generally try to sharpen knives to ES condition, mainly because it is extra work to get an edge to this keenness and usually it will quickly dull back to VS condition. I will occasionally hone a special purpose blade, such as a Wharncliffe, to ES if I need to use it for fine work (e.g., cutting stencils or such). Some blades will easily sharpen to ES condition, which is a nice thing when you find it. In summary, my opinion is that generally a knife should always be sharpened to VS condition. If you have one that readily sharpens to ES and holds such an acute edge well, then all the better. In any case, I make it a practice to touch up my knives whenever they dull to SE condition. This makes for a much easier sharpening job than if one lets a knife dull to NS condition before resharpening. Touchup sharpening When I have a knife with the edge dulled to somewhere in the SE acuity range, I give it a touchup sharpening sooner rather than later, using the tools and techniques I am about to describe. This will almost always quickly and easily bring the edge back to VS or ES condition, provided that I have not overworked the blade enough to drive it to NS condition, or damaged the edge in some manner. The tools I use to do touchup sharpening are a Lansky Masters Edge https://www.chuckhawks.com/lansky_masters_edge.html ceramic rod sharpener and either a plain butchers steel or a treated leather paddle strop. No kidding — that is all I need unless the blade edge is grossly dulled or has some significant damage, such as small chips, a bit of rolled edge, or a damaged tip.
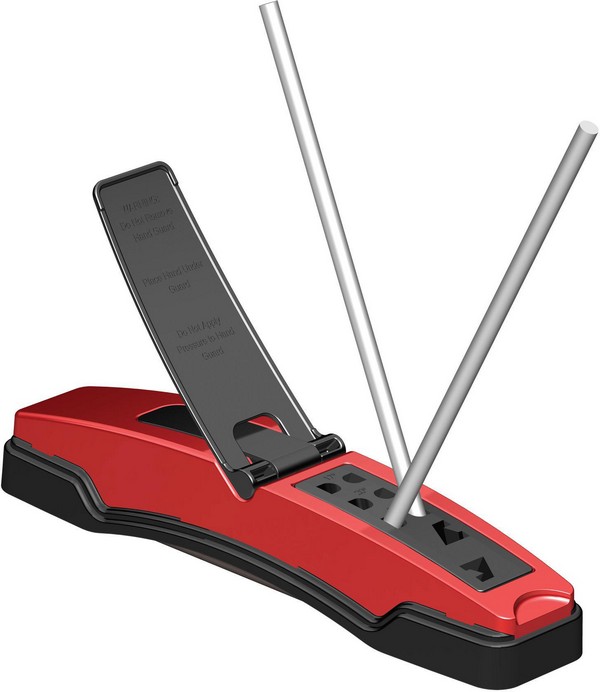
Lansky Masters Edge ceramic rod sharpener. Illustration courtesy of Knife Center. Although I have owned and used several ceramic rod sharpeners over the years, the Masters Edge is now my go-to tool of the type because it comes with both medium and fine grit rods, which can be set with each rod at 17, 20, or 25 degrees off vertical. I set up my sharpener with the medium grit rods installed at whatever angle is suitable for the blade I am sharpening. (I sharpen most of my general purpose knives at 17 degrees each side.) Then I simply start stroking the blade straight downward on the rods, alternating passes on each side of the blade. When I begin working the blade on the medium grit rods, I will both feel and hear a roughness as the blade works against the rods during the first few strokes. This feel and sound is important, for it tells me when I have worked the blade enough on the rods — I will be able to feel the blade moving over the rods more smoothly, and the sound will become more muted. When
I feel that I have reworked the edge enough on the medium grit rods,
I switch to the fine grit rods and repeat the process. Again, the
feel and sound of the blade on the rods tells me how I am doing. I
work the blade on the fine grit rods until it moves over them very
smoothly and barely whispers to me.
(As
an aside, my father taught me how to sharpen a knife on a simple
bench stone when I was only six years old. He told me, “Feel
and
listen, boy. The knife will tell you when you are getting it
right”
— or words to that effect. Dad was not putting me on.)
Using
a ceramic rod sharpener is not a strong-arm exercise. Use only
enough force to add a bit more pressure than the weight of the knife
itself exerts against the rods. Again, it is a matter of feel. How much work on the ceramic rods will it take to do a touchup sharpening? It depends on how dull the blade is, how sharp you want to make it, and what is the steel in question. Modern “super steels” will take more work than common carbon and stainless steels, but only the most intractable super steels cannot be touch-up sharpened on ceramic rods. Been there, done that, got the tee shirt.
Also,
knife blades are individuals, with unique temperaments. What I mean
is that some of my knives will take an ES edge fairly easily, while I
cannot get others beyond VS condition without more effort than I
really want to expend. I have some theories about why this is true,
but discussing them would take us far afield. I will just say that I
can readily sharpen almost any knife I own to VS condition. I am
good with that, for I can do a lot of work with a VS knife. My
knives that are easily sharpened to ES acuity are my rock stars.
Once
I am satisfied with the work I have done using the fine grit rods, I
redo the paper slicing test described above, to verify that I have
achieved a smooth and even sharpening of the blade and how sharp it
is (VS or ES). Finishing the edge
All
that remains is to hone the edge on a butchers steel or leather
strop. This is optional, really, but I have both tools and I like
the last little bit of edge quality that a few strokes on a steel or
strop gives. Using either a plain butchers steel (see note below) or
a strop treated with green or red honing compound, I give the blade
three to five light strokes, each “stroke”
being an alternating pass on each side of the blade. Then I do the
paper slicing test once more, to verify that the job is done.
A
steel or strop will get much the same results, so both are not really
needed. Which tool I use pretty much depends on my mood at the time. Sharpening an edge vs. grinding a primary bevel The method I have described is arguably the quickest, easiest, and most nearly foolproof way to get a really good edge to a knife that is not badly dulled. All it does is refresh the very narrow secondary bevel (also called edge bevel or micro bevel) that forms the actual cutting edge of the blade. The primary bevel of the blade is not in play. If a blade is dulled to NS condition or has damage such as small chips in or minor rolling of the edge, I would start resharpening it with conventional bench stones or a diamond plate sharpener. The objective here is to restore the edge bevel to SE condition, while removing any minor damage to the edge. Conventional stone tools work fine for common carbon and stainless steel blades, while a diamond plate sharpener is much more effective for the modern “super steels.” Once the blade is restored to SE condition, with no chips, nicks, or burrs to be found, I would switch to my ceramic rod sharpener and steel or strop to finish the job. I do not believe in grinding the primary bevel on a blade unless I am forced to. The most likely problems that would necessitate doing this would be one or more large and/or deep chips in the cutting edge that need to be ground out, or a badly rolled edge that has essentially destroyed the edge bevel. In such cases, the primary bevel must be ground enough for the secondary bevel to be recut (set back) as much as needed to remove whatever damage the cutting edge has sustained. If I have to grind the primary bevel on a common steel blade, I will break out my “tri-hone” bench stone set, with silicon carbide and soft and hard Arkansas stones. Any good conventional bench stones of the appropriate grit and hardness will do a good job of setting back the primary bevel of blades with steels reasonable easy to grind. (Diamond plate sharpeners will also do the job, of course.) Then the edge bevel can be reground on the stones and the edge refined on a ceramic rod sharpener. I have not had a wealth of experience with reputed “hard to sharpen” steels, but I have worked with ATS-34, D2, and CPM-S30V and -S35VN. Right now I have two knives with ATS-34, three each with -S30V and -S35VN, and half a dozen with D2. I have applied my touchup sharpening method to each of these at least a couple of times with totally satisfactory results. These steels take roughly twice as many strokes on the ceramic rod sharpener, compared with common carbon and stainless steels, to sharpen them to VS or ES acuity. Since these steels need sharpening less frequently, though, it all balances out. I have not attempted to grind on the primary bevels of any of these knives, other than just enough exploratory work to prove to myself that it can be done on a diamond plate sharpener. I see no point in doing the tedious work of messing with the primary bevels of such highly wear resistant steels, though, when I know I can keep them sharp by the relatively easy method I have touted herein. If I ever need serious work done on the primary bevel of a “super steel” knife, I will send it for factory reconditioning or put it in the hands of a bladesmith who has the tools and expertise to do the job right. Conclusion I own several hundred dollars worth of sharpening tools. Key items include a tri-hone bench tool with conventional stones, a diamond plate tool, three ceramic rod sharpeners, a plain butchers steel, and two leather stropping tools. Plus I have miscellaneous items such as small field sharpeners, needle files, etc. Yet I do 90 percent or more of my routine knife sharpening with the Lansky Masters Edge ceramic rod sharpener (about $ 40 retail) and either a plain butchers steel (about $20), or a paddle strop treated with honing compound (roughly $30 to $40). My touchup sharpening method, using these relatively inexpensive and easily used tools, works for me. I encourage readers to give it a try. Note on choosing a honing steel: There are plain butchers steels, plus diamond dust impregnated steels, ceramic coated steels and jumbo ceramic sharpening rods. All but the first are, functionally, sharpening tools, for they will remove metal from the edge of a blade. I use a plain steel because the ceramic rod sharpener has already been used to cut the final edge, so using any of the other tools mentioned would simply be repeating that process (and might actually mess up what has been accomplished using the ceramic rod tool). Aligning the edge with a non-grinding steel is all that is needed once the job on the ceramic rod sharpener is finished. I recommend a plain steel with a rod about 10 inches long, retail priced at about $20. |