|
Building a .338 Lapua Magnum Rifle By Shane Morgan 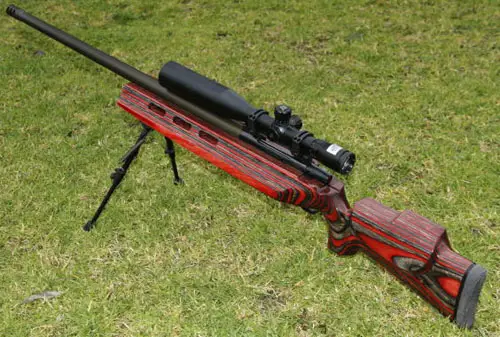 When we think of a cartridge like the .338 Lapua Magnum, most of us would immediately think of military sniper rifles and target systems. To an extent that would be true, but today's long distance shooters are always looking for a cartridge that can push the boundaries. In my case, that would be a cartridge for long distance feral animal removal. What became the .338 Lapua Magnum dates back to about 1983, when it was a .338 wildcat based on the 416 Rigby case. Lapua commercialized it in 1987, using a new case design. You can find more about the history of the .338 Lapua Magnum in Guns and Shooting Online on the Rifle Cartridges page, which gives a very good description of this extremely powerful cartridge. I build most of my rifles for myself, or for friends who request a rifle in a wildcat cartridge. When they ask, I find it hard to say no, as usually what they ask me to build catches my attention. The 338 Lapua Magnum is one such cartridge. When it comes to a cartridge that is specifically designed to reach out to very long distances and whack its target with total domination, then it is hard for me to pass on this beautiful round. The request for such a rifle came from my friend Todd, for whom I have built several rifles in the past. He wanted a heavy rifle with a solid stock and a very heavy barrel for ultra-long distance feral removal. It was required for distances in excess of 1000+ yards. I chose to stay with M.A.B. barrels, also known as Total Solution Engineering, as their barrels I have used have always been of excellent quality and reliable accuracy. This barrel is 32" long with muzzle thickness of 1" plus the muzzle brake. The stock would be a heavy Micro-Fit laminated Tactical stock with a 4-1/2" forend in a color scheme called Black Widow, which is a black and red color combination. The scope for this build is a Bushnell 6500 series 4.5-30x50mm with a Mil Dot recticle and tactical turrets, mounted on a Ken Farrell picatinny rail and matching rings. I tend to use the same manufacturers when building my rifles, because they have been reliable in the past and I cannot see the need to change what is not broken. Reamer and gauges were purchased from Manson reamers in the U.S.A. I find their reamers and gauges of excellent quality and manufacture. I used a Weatherby Vanguard blued/synthetic rifle in .300 Weatherby as the base for the rifle, as I have done on many of my builds. The reason is that I find the action extremely well built, strong and easy to set up and customize. I usually sell the synthetic stock on EBay to save a bit of cash for the owner. I have found Vanguard triggers excellent for modifying and have reduced them to a two pound pull, which makes a crisp release and perfect feel. When building rifles and machining the barrel blanks, the set up of the blank in the lathe is the most important starting point for accuracy. As I have built rifles in different calibers, I always made a tool that fits the barrel perfectly and that has a larger piece protruding in which to use a dial indicator to true the barrel off the rifling at both ends. I find this technique gives the best accuracy along the axis of the rifling and gives you a head start in having all things true and concentric with the finished chambered barrel. I true both ends of the barrel to within 0.01mm. The addition of a muzzle brake was mandatory for the .338 Lapua cartridge, as it is no slouch in force at both ends. If not used with a muzzle break, the violent recoil might cause the shooter to flinch and all the work and effort needed to build such an accurate rifle would be for naught. On completion of the machining of the barrel and threaded end for the brake, I chose to finish the barrel in Cerekote. This baked-on ceramic finish is extremely durable, scratch and moisture resistant. It leaves the rifle with a very professional finish. The laminated tactical stock used on this rifle was heavy and, because of the wide proportions of the forend, put more timber at the action. This caused three minor problems for me. The first being the width of the stock at the bolt area. I had to remove wood from the bolt side, so that the bolt could be closed. This had to be done in a way that did not spoil the finished effect or the balance of the stock and barreled action when assembled. This can be seen in the photos of the finished rifle and I feel it was accomplished quite well. After removal of the timber from the bolt handle side of the stock, it was also necessary to extend the length of the bolt handle so it could be easily grasped and operated. In this case, I used a piece of steel and machined it in a conical shape and put a knurled pattern around the end for grip, the round knob part of the original bolt handle was then ground down as to fit the hole machined in the extension piece, which I epoxied in place and hand blued. The finished result was quite pleasing to the eye, considering the size and build of the finished rifle, and gave quick access to the bolt. The extension also compensated for the weight of the wood removed from the stock. As this stock has a high cheek piece, I had to remove wood from the front of the comb to allow the bolt to be fully opened and removed. This was the last little problem with which I had to deal. 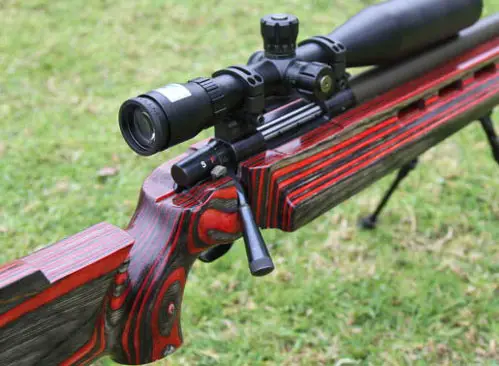 The stock was fitted with steel pillars and the action bedded in plasti-bond, which is my favored bedding compound. The stock was then given an oil rubbed finish to 800 grit, starting with 200grit and moving up in 200 grit lots. I allowed t he stock to dry for 24 hours between the different grits. Seven days after the sanding preparation, I sprayed it with five coats of polyurethane. This is the first time I have actually oil rubbed a stock, then used a polyurethane final finish. I had previously always favored a traditional oil rubbed finish. To my surprise, I found I had the best of both worlds and a very well sealed stock. The oil brought out the grain of the laminate and the polyurethane glossed the finished product and locked everything in. This finish beautifully highlighted the stock's red laminate, creating a striking effect. As the Vanguard bolt face is made for a standard .532" magnum rim diameter, I had to machine the rim of the bolt face in my lathe to accept the larger .338 Lapua cartridge rim. This was a simple machining job where the set-up took longer than the machining itself. The ejector was then slightly modified so it would sit flat and level and allow for the extra movement of the oversize case. The shoulder of the barrel that encloses the bolt must be machined wider to allow free movement of the ejector when the bolt slides the cartridge into the chamber. Otherwise, the ejector will jam against the chamber wall and not allow the round to be chambered. Once the rifle was assembled, it was time to add the scope mounts, a Ken Farrell Picatinny Rail and 30mm matching rings. The mount was bedded when installed to allow for any inconsistencies with the top of the action. I have found in the past that mounts can be slightly out of alignment and the bedding removes any imperfections that could cause problems later. Farrell's tactical rings are one of the best I have used and I have used them on many rifles. I have always been extremely pleased with their performance. The scope chosen for this rifle was a Bushnell 6500 series 4.5-30x50mm with tactical turrets. Once mounted, they were fixed to my eye position and bore sighted. Todd would later adjust the scope for his personal comfort and eye relief. The finished weight of the rifle and scope was 20.9 pounds without a bipod. This rifle is one serious piece of business and not one I would want to lug around on my shoulder. Todd's intention is to carry it on a quad bike to a location where it can be set up and positioned. Targets are then spotted and ranged, atmospheric conditions measured and everything input into a hand held PDA ballistic program and a target solution given. It is a different kind of shooting, but when the game is feral animal eradication at extreme long distance, that's it in a nutshell. Our main targets are feral goats and pigs and we are dropping them out to 1200 yards. (Children, do not try this at home with your factory built rifle! -Editor.) Prior to our first trip to our hunting location, Todd had done a lot of testing and load development using Lapua 250 grain molycoated Scenars as his primary bullet. His test velocities were pushed out to the 3000 fps, but accuracy suffered, so the load was wound back until the groups tightened. Most of his load development was done at 100 yards and after major trial and error effort, he arrived at his most accurate load. This is 83 grains of ADI 2213sc, which gave him a velocity of 2793 fps and a 7mm group size. O.A.L. of the loaded cartridge was 96mm. To say he was over the moon would be an understatement. He was comfortable with the rifle and confident he had found a perfect load. We eagerly anticipated our first hunting first trip with this rifle. After zeroing at 400 yards and achieving average groups of just over 1", we set up the 1000 yard range. The weather conditions were perfect and the rifle performed, returning five shot groups under10". I was thrilled with the performance of the rifle and so was the owner, so now it was time for the feral animals. The first shot was around 930 yards on a goat, which dropped in its tracks. The rest of the trip was mainly spent shooting this rather large and earth shaking rifle. With the muzzle brake and such a heavy rifle, to me the recoil felt similar to an eight pound, .308 Win. rifle. Our set-up was perfect for the shooting we were doing and I felt very comfortable. After firing a set of five rounds, I suffered no shoulder pain or flinch, although the ground does tend to shake around you and excellent hearing protection is critical. I was wearing electronic ear muffs. Some prefer to wear ear plugs under the muffs, which is probably a good idea. Make sure your hearing protection is of very good quality and that it is always worn. Otherwise, you may be hearing bells for weeks. The spotter for a .338 Magnum rifle fitted with a muzzle brake must be aware of where he stands or sits, as the percussion coming out to the sides of the rifle is very harsh on all parts of the body. The rest of the shoot was spent pushing this rifle as far as we could. My personal best was a goat at 1230 yards. Todd achieved a very impressive 1361 yard kill with a five mph cross-wind. That is excellent shooting in anyone's book. Ultra long distance shooting is not for everyone, but if you have the skill and opportunity to lay down behind a big hitting rifle such as this .338 Lapua Magnum, it can be enjoyable. As for negative aspects, I would say with this rifle I could find only one. That was the scope's ability out past the 1200 yards, which I found to be really pushing the old optic nerve and eye strain was starting to develop after a few very long shots. The obvious answer would be to move up in quality to some thing like a Nightforce scope, which I feel would deal with eye strain a little better on very long shots. Unfortunately, when you start pushing the limits everything gets expensive. We were pushing the limits of our rangefinders, as well. The farther we go, the more expensive it gets, but that is part of the joy of ultra-long distance feral shooting, which I just happen to love. |