|
EZ Tool Instructions Preface Reprinted below is the instruction manual for the Savage EZ Tool. I ordered an EZ Tool for my Savage 10ML-II and, in the subsequent exchange of e-mails, Tom sent me the instruction sheet for his EZ Tool for 2-piece scope bases. (The instructions for 1-piece bases are similar.) I thought that it might be of interest to others, so here it is in its entirety. - Chuck Hawks 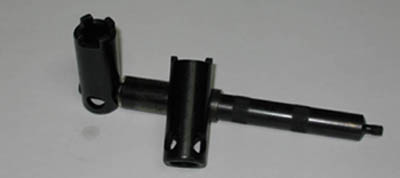 Savage 10ML II Owner Please find enclosed the New Savage EZ Tool for two piece scope bases that you ordered. Not only is this a good concept, but also a quality tool. To use the Savage EZ Tool, start by sliding the bolt all the way open. Drop the EZ Tool into the receiver opening and slide the bolt forward, engaging the bolt firing pin support/primer holder on face of bolt into the hole on the back of the EZ Tool. Now slide the bolt forward and at the same time, rotate EZ Tool to engage tool fingers in slots on the back of the breech plug. Insert wrench handle, (came with gun), into one of the four holes provided. Note: You may want to use the hole on the right side for tightening, and the hole on the left side for removing the breech plug. This way, you will always be working away from your scope, should you have one mounted on the gun. Now, using slight forward pressure on the bolt handle, (keeps EZ Tool fingers trapped in the slots on the back of the breech plug), you can remove or install the breech plug. I would like to pass this tip on to you that helps make the EZ Tool more user friendly. It works for me and I'm sure it will work for you: after you break the breech plug loose, remove wrench handle and point gun on a downward angle. This allows the weight of the bolt itself to put a slight forward pressure on the back of the EZ Tool, keeping the fingers of the EZ Tool engaged in the slots of the breech plug. Place your thumb against the stock and use your index finger(s) to roll the EZ Tool counter-clockwise unscrewing the breech plug from the barrel. You can also use this method to install the breech plug by rotating the EZ Tool clockwise until it stops, then use the wrench handle to tighten. This is much faster than turning out with the wrench handle after the breech plug has been loosened. You will be surprised at how fast this works. If you remove the breech plug on a regular basis for service as instructed by Savage Arms and use a good quality anti-seize, you will find it comes out EZ using this method, hence the name of the tool. Using the EZ Tool, you have less chance of damaging equipment as opposed to other means currently available. As an added precaution, you can go to your local hardware store and purchase 1ft. of soft clear plastic tubing, (25�), size 1/2" od x 3/8" id. Lube the inside of the tubing and slip it over end of the wrench handle to a point approx. 2" above where the wrench handle and EZ Tool come together, (this is a snug fit). Then cut plastic tubing off at shoulder line of wrench handle. This is added insurance to prevent marring the finish on equipment if you feel that is necessary. I haven't experienced this problem (marring), but you should always use CARE when installing or removing the breech plug to help prevent the possibility of marring finish or damaging equipment. Keep the EZ Tool lightly oiled to help prevent rusting. You will use the EZ Tool all of the time as I do, such as when servicing the breech plug, cleaning bore or vent liner change, and won't leave home without it. I hope the user friendly tip and information will help. Thanks, Thomas E. Scott (aka: Pocampo) |