|
The Harvest Event: A Brief Guide to Processing and Butchering Deer By Carl Wilson Once we have successfully filled our deer tag, it is time to get busy processing the harvest. After field dressing and removing the tenderloins, back-straps, heart and liver, I suspect most of us, once we have packed out, turn the bounty over to the local butcher shop and wait for the chops and steaks or sausage and pepperoni. I have never had my venison professionally processed, but I have heard it suggested that when you turn your venison over for sausage, you get back venison sausage. Some of it may be from your deer and some of it may be from another deer that was added to the lot for the sake of process efficiency at the butcher shop. Any and all field care you exercised to ensure a quality culinary product may have been for naught. The only way to be absolutely certain you are eating your deer is to process it yourself. It is best to be ready for the processing before the harvesting. Prudence dictates locating a meat cooler you can utilize prior to the hunt, if you intend to age the meat. While a young doe does not require it, flavor wise, she will still benefit from dry aging. An older buck will most definitely improve. A phone call to the local butcher shop may be all that is required. For a fee, many of them will hang your deer to age. Of course, not all states or seasons require a cooler, as the ambient temperature in your garage or shed may be sufficient to prevent spoilage, but during the early archery season, you will likely need a cooler of some sort. THE HOMEOWNERS MEAT COOLER Another option is your own meat cooler, a temperature controlled environment suitable for hanging and aging. The spare fridge in the garage with a temporary conversion for dry aging is a natural choice. This temporary conversion is done ahead of time; it's a good off season project. 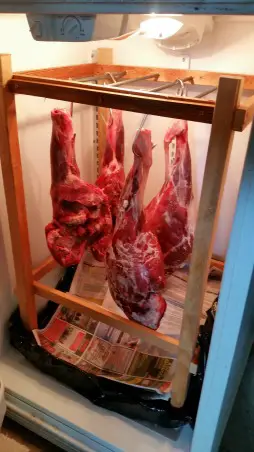 You can see the relatively simple 2x2 wooden frame that easily slides into position. It has ample strength for hanging deer quarters. This set-up works for deer size game. Once we have constructed the frame, secured our stainless meat hooks and emptied, or at least substantially reduced the inventory of, the fridge prior to the hunt, we are ready for a deer. After pulling out all the shelves and drawers, but prior to installing the rack, put a plastic liner and newspaper at the bottom of the fridge, so any dripping will be captured and make the conversion back to refrigerator easier. This is a setup for dry aging. Fewer and fewer of us are familiar with dry aged meat. Due to refrigeration advancements and plastic wrap development in the 60s and 70s, a process called wet aging was discovered. As a result, around 90% of supermarket meat was no longer dry aged by the 1980s. If you follow the dollar, it is easy to understand why. To begin with, whole or half carcasses or large primal cuts, at the minimum, need to spend anywhere from a week to a month, and even longer in some cases, in a climate controlled environment. Temperature, humidity and air flow all need to be monitored within a narrow window. Too cold and enzymatic activity ceases, too warm and spoilage occurs. Too humid also encourages spoilage, while too dry results in too much weight loss via dehydration. Insufficient air circulation can lead to uneven drying. In addition, with dry aging, the exterior of the cuts naturally dry out, necessitating a bit of trimming; the result is more weight/profit loss. The benefit is a concentrated flavor and a change in texture that you simply do not get from wet aging. That is why you pay a premium for dry aged beef. Think Ruth Chris. Wet aged meat can be subprime cuts and since there is no atmospheric contact necessary, the cuts can be packaged and shipped right away. They age in transport and on the supermarket shelf. Since no atmospheric contact is necessary, there is no need or benefit from hanging. Wet aging is a tenderizing process, not a flavor enhancing process. 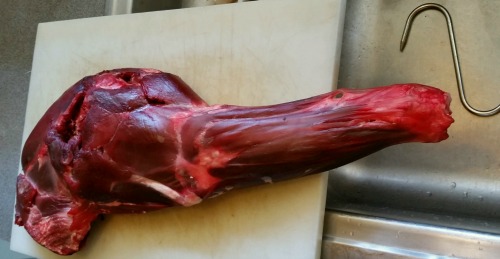 If you dry age your venison it results in a little meat loss, as the outer layer dries and must be trimmed. I save the trimmings and further dehydrate them to make treats for the pooch. CONTROL THE VARIABLES We have returned from the hunt and have our quarters hanging in the "meat cooler" for a bit of aging. The temperature at which we age our meat is critical, but there is an acceptable range, 34 to 38 degrees being ideal. Remember, north of 39.9 is the danger zone, while south of 32.1 is frozen. A small reefer thermometer is a good idea, so the temperature can be regulated ahead of time. Modern frost-free refrigerators do not have the ideal humidity. Knowing this, I use the refrigerator anyway, with fantastic results. I suppose I should mention, this dry aging is strictly for tenderizing and flavor enhancement, not preservation. Drying and curing, aka charcuterie, have different temperature and humidity parameters, as nitrites and nitrates are introduced. With our quarters in the controlled environment, two to fourteen days have the most pronounced effect on tenderness, with it leveling off around day 28. For me, it is time to get busy after about a week. Nothing scientific here, just the weekend after a hunt, after I have gotten my gear squared away and had the chance to rest up. Processing takes me longer than a pro; I am not using a band saw and making traditional subprime cuts, I am boning-out my venison and attempting to utilize every bit of meat. I am looking for kitchen/recipe ready cuts when I pull my processed venison out of the freezer, which means a little extra time and care before it goes in the freezer. You don't want a glob of frozen venison that is unidentifiable; you might think you're defrosting fajita meat, but it turns out to be stew chunks. Start with a front quarter and put it on a large cutting board. You want adequate working room, sharp knives and a bone saw at hand. A hacksaw will work in a pinch, as will a cleaver. However, a cleaver may leave bone shards behind, so I prefer a saw. If you do not have a boning knife, a short fillet knife will suffice. Our goal is to separate as much meat as possible from the bone; the bone we save for making bone broth. The lower shanks are incredibly time consuming to bone out properly, due to the small muscle groups and silver skin linings, which we normally want to fillet off the meat prior to packaging and freezing. Therefore, I prefer to saw off the lower shanks at the "knee" for braising whole. This lengthy, moist cooking method breaks down the silver skin and ligaments that, along with the bones, have naturally occurring collagen, amino acids and minerals, which makes your braised shank broth extremely nutritious. A portion of braised shank, nestled in a bed of risotto or barley and swimming in broth, is one of my favorites. After removing the lower shank, start isolating the exterior muscles of the upper quarter, using your fingers to separate them and the knife to trim them off; this process is known as seam butchery. Continue this process, working around the bone until all the meat is off the bone. Now, return to your pile of trimmed meat and start filleting the silver-skin lining off of the meat. This is easier said than done, but well worth the effort. As you progress through your trimmings, think about how you might cook it: whole roasts, fajita meat, stew chunks, steaks, kabobs, ground, etc. By having a cooking process in mind, you can tailor the trimming of the muscle to accommodate the recipe. Then package it, size appropriate for your family, and label accordingly. As the "stew chunks" or "chunks for grinding" piles grow, a good idea is to freeze them as individual chunks. Separate them on a cookie sheet and pop them into the freezer; once they are frozen you can bag them. This is particularly helpful when you are grinding, as a small frozen chunk grinds easier than a room temperature chunk. Doing this also allows you to pull as few, or as many, from the bag as you need, while the balance of the bag remains frozen. Vacuum seal, or freezer wrap and label everything with the date, days aged, cut and the intended recipe. Remember, there is quite a window for aging the meat and, at this point, I am ready for a break. I don't worry about the other three quarters, they can continue to age until tomorrow or the next day, or next week. By properly labeling our meat, it is easy to compare five days aged with ten days aged. Moreover, breaking the butchering process into four events, makes it a much less daunting task. Journaling the age of your deer, the time and place of the harvest, the method of take, processing and aging notes, as well as table fare results, eventually allows you to make educated reckonings as to how long you want to age a particular deer. Common knowledge dictates that generally, the younger the deer the shorter the time it needs to spend aging. Regardless, enjoy the blessings of the field and honor the harvest with proper care that we might truly be thankful for the bounty. |