|
Knife Sharpening 101 - The EZ Method A sharp knife is dangerous in careless hands. A dull knife is dangerous, period. -Anonymous By Gary Zinn 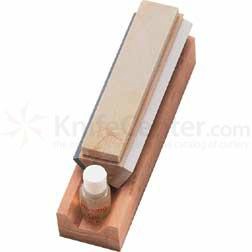 Tri-Hone Sharpening System. Image courtesy of knifecenter.com My father gave me a pocketknife for Christmas when I was six years old. A few months later, he taught me to sharpen it. By these two acts, he gave me the lifelong gifts of a love of knives and the ability to maintain them. The way I learned to sharpen knives was very simple. The tools we used consisted of a 2x6 inch double sided whetstone, medium grit on one side and fine on the other, a small bottle of lamp oil and a leather strop. No, I am not forgetting anything. Working freehand on that old whetstone, with the lamp oil for a grinding medium, Dad could sharpen any knife in a few minutes and then fine tune it on the strop. Today, the market offers a host of knife sharpening gadgets, some of which cost as much as a good knife. I have tried several, most of which are lost somewhere in my attic or workshop. Dad would have been so unimpressed with most of these that he would not have touched them. I think he would approve, though, of those few I have kept and how I use them in the context of what he taught me. My sharpening tool kit is a modest extension and refinement of the tools that Dad used. I call my technique the EZ sharpening method, in honor of my father, whose given name was Earl. The tools I use are:
Starting from scratch, one can buy this setup for about $100, with judicious shopping. Plus, the only recurring small expense will be for honing or mineral oil. I have had my tri-hone set and butchers steel for over 30 years and I expect my survivors to argue over who gets them. My crock sticks are newer, because I dropped my previous set and broke one of the rods. Let us walk through the process of sharpening a knife using these tools. Say we have a knife that has been neglected, with a blade that is quite dull and even has some nicks. This knife needs the full treatment, starting with the coarse stone. The coarse stone, made of silicon carbide, is used to rough work a heavily dulled blade. The term "setting the edge" is often used to describe this first step, but that is misleading. The real purpose here is to refresh or even slightly change the bevel of the blade, i.e., the worked area between the cutting edge and the undisturbed sides of the blade. This first step is really setting the bevel. The basic process is simple. Set the coarse stone in the top position on the tri-hone base, oil it lightly, and begin stroking the blade across it. Important: stroke the entire cutting edge across the stone on each pass. Suddenly, hands are popping up in the classroom, for there are many questions. I will address these on the fly: Q.: How much oil should I use? Q.: Do I have to use honing oil, or can I sharpen dry? Or, can I use water or something else? Q.: In which direction should I stroke the blade? Q.: How many strokes should I take on one side of the blade before turning it over to work the other side? Q.: Should I stroke from the base to the tip of the blade, or tip to base? Q.: At what angle should I tilt the blade off of the stone? Q.: How hard should I press the blade against the stone? Q.: How many strokes should I take on the coarse stone, before moving on to the next step? Q. How do I work the curve and tip of the blade? Q.: I already have a set of bench stones. Do I need a tri-hone set? Okay, the first stage is done. Wipe any loose oil and sharpening residue off the blade and stone. Then, switch to the medium stone, which is a soft natural Arkansas stone. Dribble some oil on it, spread it across the stone and start stroking. The purpose of stage two is to smooth the new bevel you cut in stage one and to begin developing the cutting edge. Two things to note: The soft Arkansas stone is much smoother than the silicon carbide stone, so it will cut much slower. In addition, you do not want to be as aggressive in trying to remove steel as in stage one, so use slightly less pressure. With your first strokes, you will get the scratching feel and sound I described for stage one, although it will be more subtle. As you continue stroking, this will smooth and fade out. It will generally take about 12 strokes to complete stage two. With stage two completed, clean the blade and stone again and move to the fine stone, which is a hard Arkansas stone. Repeat the process described for stage two, remembering that this stone is the smoothest of the three and will do the least cutting. That is okay, because the purpose of stage three is not to remove much material, but rather is to polish the bevel and refine the cutting edge. Use slightly lighter strokes than in stage two. Stage three is done when the blade glides across the stone very smoothly and quietly. Again, some 12 strokes will generally do the trick. Clean the fine stone and set the tri-hone aside. Now, the edge is ready to be finished with the crock sticks and butchers steel. Use a bit of soapy water on a paper towel to clean the knife blade, then dry it. This is important, so that you do not get oil or sharpening residue on the crock sticks or steel. Use these on clean, dry blades only. The first step to finish the edge uses the crock sticks (ceramic rods). Set them in their base, then slice the knife downward on the inside of each stick in turn, working the blade base to tip with each pass. Using light pressure, stroke the blade smoothly on the sticks until you feel virtually no drag. Generally nine to 12 strokes will do. 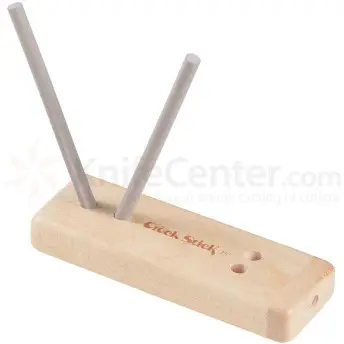 Lansky crock sticks sharpener. Image courtesy of knifecenter.com For a final touchup of the edge, work the blade on the butchers steel (sharpening steel). Angle the blade at about 20-degrees to the steel and apply just enough pressure to feel the grain of the steel through the knife blade. Do eight to 10 strokes, base to tip. Q. What about stropping? Would that not improve the edge even more?  Victorinox 10 inch Sharpening Steel. Image courtesy of knifecenter.com Do not forget that a steel is the first resort when a knife begins to lose its edge. Working an edge on a steel can restore it nearly to top form, extending the time until a real sharpening job is necessary. Testing the edge If all went well, the edge should be factory sharp or better, but it is always good to check. Do not use any part of your body to test an edge, you might cut yourself! Instead, grab an old catalog or magazine, preferably one with glossy pages. Lay it down and lift up a single page. Push the tip of the blade through the page near the top and then gently cut down and forward through the page. If the blade cuts smoothly from tip to base, it is done. If the paper does not cut cleanly, make another cut or two to confirm that the edge is not up to par. If so, back up to stage three, the fine stone. Give the blade a few gentle strokes on that stone, clean and dry it, and work it across the crock sticks and butchers steel again. Then recheck the edge. I cannot remember the last time this simple retouching did not do the trick. I recently did a sharpening marathon. I sharpened all of our kitchen and steak knives and a few of my working knives, a couple dozen blades in all. There were two that did not pass the paper slicing test, but the touchup I just described set them right. Q.: Does this mean I do not always have to use all three stones to sharpen a knife? Oil and other grinding media On this subject, there are dos and do nots. Violating the do nots is a cardinal sin, so I will cover them first. Do not use motor oil, gun oil, or a general purpose household oil, such as 3-in-1. These oils are heavy and viscous enough that they will eventually clog your stones, which ruins them. I learned this firsthand. As a young adult, I bought a whetstone and, not knowing better, used 3-in-1 oil on it. Three years later, I had a gooey brick. In addition, do not use WD-40, silicone, or similar speciality lubricants. Commercial honing oil is made for sharpening, so it is no surprise that it works right. After the 3-in-1 oil fiasco, I used only honing oil for years. Then I learned a secret: many commercial honing oils are actually mineral oil with small amounts of other chemicals added. Then the price is marked up to a multiple of the price of straight mineral oil at drugstores. See where this is going? My go to grinding medium is pure drugstore Mineral Oil USP. It is readily available, inexpensive and does the job without complications. Light vegetable oils, such as sunflower or extra light olive oil, are also okay for sharpening. Corn oil is too heavy for sustained use. Some commercial honing oils are vegetable oil based. Water is not as good for sharpening as oil, but it is much better than dry sharpening. I do not hesitate to use water to do a light touchup on a couple of blades, especially in the field. However, for heavy jobs and to get the best possible results, I use oil. Why I do single pass strokes I have mentioned that I always make single, alternating passes on each side of a blade when sharpening. This applies whether working the blade on stones, crock sticks, or the butchers steel. Why? Because this is how my father taught me to do it. The pattern has always worked for me, so I see no reason to change. Others may favor a different pattern and that is fine. Ultimately, it is a question of personal preference, for it is results that matter, not a specific technique. More about sharpening angles Q.: How is a political argument like charcoal? Unfortunately, the issue of sharpening angles seems to have become a political argument. I expect a sponsored website devoted solely to the topic to pop up any day. Here is my take on sharpening angles and how to achieve a desired angle, more or less, when doing freehand sharpening. I do not know how much light this will generate, but I will try to avoid getting you hot and sooty. Stating it plainly, any sharpening angle in the teens of degrees is okay with me, if you like it. Logic, study and experience tell me that blades sharpened at angles between 13 and 19 degrees cut like a knife, with predictable durability characteristics. For instance, I have a fillet knife that I sharpen thin, at about 14 degrees. It is so sharp that it scares fish into filleting themselves, but the edge will begin to dull if I give it a hard stare. Conversely, a blade sharpened thick will have a durable edge, but it will be difficult to get really sharp. I have a machete sharpened at between 20 and 25 degrees. It is very efficient for light chopping and holds its edge, but it just cannot be made keen enough for normal cutting. Split the range and what do you have? Sixteen degrees, of course. Sometimes simple math is profound and this is one of those times. I am convinced that a sharpening angle of about 16 degrees gives a cutting edge with the best all-purpose balance of sharpness and durability. When I say about 16 degrees, I mean give or take a degree or two. I will not waste time arguing with someone who insists that the correct, universal sharpening angle is 18.125 degrees and that knives must always be sharpened to that exact angle. I just wish them luck sharpening a dozen knives that precisely, using freehand techniques. Q.: Okay, I am sold, but how do I learn to hold a knife at an angle of about 16 degrees to the sharpening stone? Now play with the wedge. Lay it on a piece of smooth wood and rest the side of a knife blade on it, with the cutting edge at the tip of the wedge. Stroke the knife forward across the piece of wood, maintaining the angle. Repeat this on both sides of the blade until you develop a feel for the angle at which to hold the knife. When you are confident that you have it, you can lay the wedge aside and begin sharpening. Keep the wedge to occasionally check and refresh your memory. Q. Is there any way for me to check whether I have gotten a good bevel on a knife I have finished sharpening? First, inspect the bevel under good light. Is its width pretty much the same, base to tip and on both sides? If so, you have done well. If the bevel on one side of the blade is clearly wider than on the other, then you are not holding the same angle as you work each side and you need to adjust whichever side is out of whack. If the bevel is noticeably wider on some particular part of the blade (most likely on the curve), then you need to use a bit less pressure as you stroke that area. Similarly, if you are blunting the point, you need to use a lighter touch there. Now, use a ruler with a millimeter scale to make some quick measurements of the bevel. Here are some rules of thumb, gleaned from measuring a bunch of my own knives. (That are sharpened perfectly, of course!) On my small to medium-sized pocket knife blades, the bevel is typically barely 1mm wide. These are flat or hollow ground blades with narrow spines. On larger folding blades, the bevels generally run about 1.25mm. My hunting knives with somewhat thicker spined blades show bevels generally about 1.5mm wide. My kitchen knives are a mixed bag, ranging from small, thin paring knives with 1mm bevels, all the way up to a classic pattern butcher knife with a quite thick blade. The bevel on this beast is just shy of 2mm wide. The previous three paragraphs have been about knives with flat or hollow-ground blades. I would be remiss, though, if I did not mention Scandinavian ground knives. The bevel on these blades is quite different, but they are so easy to sharpen correctly that it is like stealing. I own three Scandinavian pattern knives, a Mora Companion, Helle Symfoni and Helle Alden. The bevels on these are 5.0, 7.0 and 8.0mm wide, respectively. To sharpen these, I just lay the factory bevel flat on the stone and stroke the blade along. The bevel is wide enough that there is no guesswork involved. Why are the bevel widths so much greater on these knives than on conventional flat or hollow-ground blades? The cross section of a flat or hollow-ground blade tapers by several degrees from the spine to the unsharpened edge, so it only takes a narrow strip of worked bevel to form the final edge. By contrast, a Scandinavian style blade tapers very little, if any, in cross section, so the bevel has to be much wider to form a sharpened edge. Are there any more questions about choosing, learning and checking sharpening angles? No? Good. Let us wrap this up, so we can get out of here and sharpen some knives. Feel and sound reemphasized I have already mentioned the importance of feeling and hearing what is happening during the sharpening process, but I want to stress it again. My father sharpened by feel and sound because he was legally blind. The backstory is that Dad's eyes were damaged by gas poisoning he suffered while a soldier during World War I. His vision was such that he could barely see the largest headlines on a newspaper, so he did close work by feel. Dad would say, "Feel and listen, boy. The knife will tell you how you are doing." He was absolutely right. Plain blades only, please The EZ method is for plain, smooth edged blades only. Sharpening serrated blades is a totally different game and I have no advice on it. Notes on tri-hone sets, crock sticks and steels I have not needed to think about buying a tri-hone set for a long time, so I had not paid attention to what is on the market. However, a quick browsing of websites revealed that there is a nice selection available. Here are some tidbits of information and notes on things to think about if you are considering investing in a tri-hone. Sets like mine, with silicon carbide coarse stone and natural Arkansas medium and fine stones, are readily available. I endorse this setup, because it has worked very well for me for many years. There are alternatives, though, such as sets with all synthetic stones, ceramic stones, or diamond sharpening plates. I noticed one that was touted as being designed for water sharpening specifically. Tri-hone sets featuring high tech materials are more expensive, of course. Another thing to consider is the size of stones. My set has eight inch by 1-5/8 inch stones, but six inch sets are more common. I also found one 10 inch set. I like my eight inch set, because I have several long bladed kitchen knives to sharpen. If this applies to you, or you are into longer outdoor knives, lean toward an eight inch set. A six inch set should be fine if most of your sharpening is on shorter blades, say no longer than five to six inches. If you are in the market, think about what sizes of knives you will be sharpening. In addition, consider what grinding medium you might prefer to use. Then, study what is available and compare the prices of different stone types and brand names. Browse tester and user reviews for useful information, but be alert for B.S. Turning to crock sticks, be sure you get a set with fine grit rods, which will be white. Crock sticks meant for household and workshop use generally have rods about nine inches long. I like this size, because the long rods are efficient for honing longer knives. Sets with shorter rods, about five inches, are available if one prefers a more compact tool. The base will have holes drilled for mounting the sticks. Ideally, the holes should be tilted so that each stick angles 20 degrees off vertical. This is a good honing angle for blades with edges beveled in the teens. For a butchers steel, get a moderately priced ($15 - $20) traditional tool with a rod about ten inches long. I do not recommend the expense of buying a steel that has a rod impregnated with diamond dust. If you run across a ceramic or ceramic coated steel sharpening rod, that is a crock stick on steroids and it is not what you want. Other sharpeners I use I have tried a number of sharpening tools over the years, but I currently have use for only a couple, in addition to those I use in the EZ method. These are the Gerber DF8 Sharpener and the Work Sharp Guided Field Sharpener. Both do a decent job of sharpening a slightly or moderately dulled blade. They are compact and easy to carry in a cargo pocket or day pack for quick edge touchups or emergency sharpening in the field. Conclusion I have used a lot of words to explain the EZ sharpening method. Fundamentally, though, it is so straightforward that a blind man can teach it to a first grader. I know this, because I was the first grader! |