|
Lansky Master's Edge Sharpening System By Gary Zinn 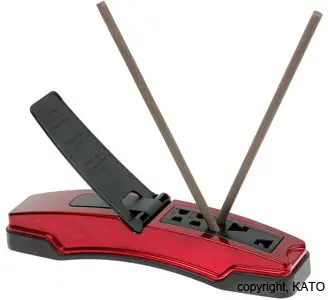 The Lansky Master's Edge sharpening system has everything that one is likely to need in a crock stick type sharpener. I say this, because it incorporates the following features in a well designed package:
I will cover the rest of the specs before getting into the use and evaluation of the tool. The base unit is 11 inches long by 2-3/4 inches wide by two inches high when closed. The ceramic rods are all nine inches long and the round rods are 5/16 inches in diameter. The 2015 MSRP is $60 and the discount retail price is about $40. Mounting and storing the rods Like any crock stick sharpener, using the Master's Edge is pretty much obvious. The round sharpening rods, either medium grit (gray) or fine grit (white), are seated in the desired holes in the base unit. The pair of holes nearest to the middle of the base holds the rods at an angle of 17 degrees to either side of vertical, the middle pair of holes yields rod angles of 20 degrees and third set of holes for the round rods holds them at 25 degrees. (The image above shows rods seated in the 25 degree holes.) The degree angle of each set of holes is marked on the top of the holder. The three sets of sharpening angles described are, to my knowledge, unique to this sharpener. I am aware of no previous system that had more than two sets of holes, usually at 20 and 25 degree angles. In addition, the Master's Edge has another unique feature, a triangular rod for sharpening serrated blades, with two slots for mounting the rod for use. These slots are toward the end of the base unit. Mounting the rod in one slot will angle it to the left and mounting it in the other will angle it to the right. (I know of at least one ceramic sharpener that has triangular rods, but not along with round rods.) Something else to be noted about the triangular rod: the three corners of the rod have different radii. I.e., one corner has a very tight radius, the next a larger radius and the third a still larger radius. The purpose is to match fine, medium, or coarse serrations in serrated knife blades. The rod can be mounted so that whichever radius desired is presented for working a knife blade against it. The final feature of the system is one about which I have mixed feelings. The base unit has a hollow bottom, with a rubberized foot at each end. These feet have a duel purpose. First, they are just grippy enough to hold the unit in place on a table or other work surface and, second, they have slots and shoulders molded in, for storage of the sharpening rods. (See the image below; the triangular rod is in the center with fine [white] rods above and medium [gray] rods below.)  The positive aspect of this feature is that it provides for convenient storage of the rods. However, I have three perhaps silly reservations about the design. When I first placed the rods in the storage slots, I had trouble getting the triangular rod securely into its slot after I had stored the round rods. The fit seemed too tight at first, but I figured it out after some trial and error. Storing the last rod just takes a bit of fussing. Second, I wondered how securely the rods would be held. Ceramic rods are quite brittle, and if one is dropped it will more than likely break or chip, which is a bummer. However, I have convinced myself that the rods will not slip out when all five of them are completely seated in the slots. My third reservation still nags at me. This concerns removing the stored rods. The sides of the base unit arch up slightly in the middle (this can be seen in the first image). I am sure the intent of this was to provide access to pry the rods out of their storage slots, but the idea scares me. Because they are brittle, I am not comfortable with prying on the middle of the rods to remove them from their slots. I solved this phobia by taking a different approach; I pry on one edge of the triangular rod to twist it out and then I can easily pry upward on either end of the round rods to remove them. This avoids the potential for breakage by applying pressure to the middle of the rods. Using the tool I have used crock stick type sharpeners for many years, so I know what to expect in terms of performance. Nevertheless, I put the sharpening system through its paces, to confirm its performance and expose any surprises. I had not touched up my fillet knife since the end of fishing season, so that was my first test. I sharpen fillet knives at a low ground bevel angle, less than 15 degrees, so I used the 17 degree rod setting to do a touchup of the edge. I first used the medium grit rods to refresh the edge bevel, then the fine grit rods to hone it, and a few strokes on a butchers steel to finish the job. The edge came out very sharp, even and smooth. We have a set of steak knives that were beginning to dull. I had a good ground bevel of about 16 degrees on these knives, so I used the 20 degree rod setting to refresh and hone the edge bevel on them. I used the same sequence as described above: medium and fine grit rods in succession, followed by working on a butchers steel. Again, I got good edges on the blades with no problems. To test the 25 degree setting, I touched up the edge on my machete. I have a ground bevel of 20 degrees plus on this blade, so an edge bevel of 25 degrees is right for final sharpening. Using the medium grit rods only, I did twenty alternating strokes on both sides of the blade, which gave me a uniformly sharpened edge keen enough to easily slice through single ply corrugated cardboard. This is my standard of sharpness for machetes. I am not a big fan of serrated knives. One reason for this antipathy is that serrated blades are a pain to sharpen. However, I do have a few serrated knives and the sharpener has that triangular rod, so I needed to test it for this review. We have a serrated bread knife that I do not believe had ever been sharpened. I checked and it did need a touchup, so it became my test subject. The largest radius edge of the sharpening rod best matched the course serrations of the knife, so I mounted the rod accordingly and went to work. I worked each serration over the rod for several strokes and, after doing all the serrations, flat honed the opposite edge of the blade against a flat surface of the rod. This nicely tuned-up the edge of the blade. I have one trick that helps get consistent results when hand sharpening serrated knives. I grasp the sides of blade, rather than the handle, so that I can use my index finger or thumb to mark the individual serration I am sharpening. By indexing each serration in turn, I can be sure that I do not miss any. Also, I hold the finger or thumb so that it just brushes against the sharpening rod as I make sharpening strokes. This helps me get each serration sharpened evenly. If the knife is serrated on the right side of the blade, mount the sharpening rod in the base so that the rod tilts to the right. Use the index finger to guide your sharpening strokes in each serration. (This is if one is right handed; if left handed, use the thumb as a guide.) If the knife is serrated on the left side, mount the sharpening rod to tilt left. A right handed person would use the thumb as a guide and a lefty would use the index finger. With proper technique and a large dose of patience, one can adequately sharpen evenly serrated blades with the triangular ceramic rod. If a knife has compound serrations with both coarse and fine serrations (e.g., Spyderco, Cold Steel), hand sharpening becomes more problematical. One can sharpen the coarse serrations with the ceramic rod, but specialized tools such as fine needle files would be needed to work on the fine serrations. My advise on compound serrated knives is to return them to the factory for sharpening. Before closing, I want to mention the Lansky Eraser Block. This is a gizmo designed to clean ceramic sharpening rods. Simply rub it vigorously on the rods to quickly remove the sharpening residue that builds-up on them. At about five dollars, this is a great accessory for ceramic rod sharpeners. The Lansky Master's Edge has all the features that I could wish for in a ceramic rod sharpening system. It is well designed and highly functional. It is now my go to tool whenever I need to touch up a slightly dulled knife or do final honing on any blade. |