The Leica M9 and M9-P Digital Cameras By Chuck Hawks 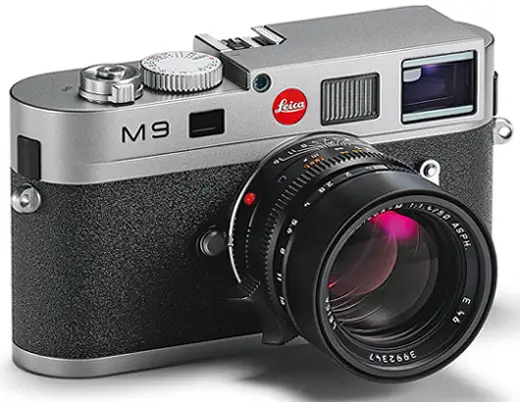 This review is intended to provide information to M9 owners and potential M9 owners. It is written for advanced amateur or professional photographers interested in taking still photographs with a Leica M9 camera. It is not a detailed operating manual, so I am only going to mention the highlights that I find interesting or useful. Nor am I going to lard this article with photos I have taken with the M9. The resolution appropriate for an online article could not do them justice and you can find plenty of M9 photos in the LFI gallery on the Leica USA website (http://us.leica-camera.com/). If you purchase an M9, please read the Instruction Manual. The English section is only 85 pages long and it is filled with detailed information of which you should at least be aware. Oskar Barnack, Development Manager at the world famous microscope and optics manufacturer E. Leitz in Wetzlar Germany, invented modern 35mm (24x36mm format) still photography and built his prototype Leica camera in 1914. (Leica is a contraction of "Leitz Camera.") Delayed by the tragic events in Sarajevo and the subsequent outbreak of the Great War (WW I), the production version of the first Leica camera was finally introduced in 1925. In 1930, Leica introduced interchangeable (thread mount) lenses for Leica cameras and in 1932 the Leica II with a coupled rangefinder and built-in viewfinder. 1934 brought the Reporter, incorporating a bulk (250 exposure) film magazine and a spring powered motor drive. Leica M System cameras for bayonet mount lenses were introduced in 1954 with the M3 camera and are still going strong today. The M5, introduced in 1971, was the first rangefinder system camera to incorporate through the lens (TTL) light metering. The compact CL, designed in cooperation with Minolta and even smaller than an M body, but with an M lens mount, was introduced in 1973. Such well known models as the M6 (1984; TTL flash metering added in 1998) and M7 (2002; electronic shutter w/aperture priority) maintained and built upon Leica's reputation as the world's premier 35mm camera manufacturer. The MP (a fully mechanical 35mm rangefinder camera in the mold of the M6 that works without a battery) and M7 35mm film cameras are still offered today. I have some personal experience with Leica 35mm rangefinder cameras, starting with the thread mount IIIf and including the M3, M5, CL and M6, all of which I have owned and used. Leica has offered beautifully made, point/shoot and semi-pro fixed lens digital cameras featuring superb Leica optics since 1998, with the introduction of the Digilux. I still own and use my first generation, sub-compact Digilux Zoom, which I use to take the photos in the field that accompany my Guns and Shooting Online hunting articles. I wonder how many first generation digital pocket cameras from other manufacturers are still in use? I paid about twice the price of a Nikon or Canon digital camera with similar capabilities for that little metal (not plastic!) clad Leica, but it has lasted more than twice as long and is still going strong. All Leicas are a long term investment, made to last while other cameras come and go. They are initially expensive, but you get more than your money's worth in the long run. I also own and use a Leica Digilux 1. This is a metal bodied, semi-professional digital camera about the size of a 35mm rangefinder camera that I bought a few years ago. It features a fast (f/2.0-2.5) Leica Vario-Summicron zoom lens and I have used it to take most of the product photos required for chuckhawks.com articles. The current equivalent model is the D-Lux 5, but my Digilux 1 still looks and works like new and will probably last the rest of my life. The Digilux and D-Lux cameras come with non-interchangeable Leica zoom lenses. Leica moved their premier, interchangeable lens, M series into the digital photography age with the introduction of the M8, which managed to retain the petite size and overall shape of an M-series film camera. Like the current M9, the M8 body accepts almost all Leica M-series lenses. There are a few exceptions to that rule, such as the old 50mm Dual Range Summicron, but they are rare. Even most of the early thread mount Leica lenses can be used on the M8 and M9 bodies by means of an M-mount adaptor, just as they can be used on M series film cameras. However, the M8 fell short of perfection in a couple of ways. Most important of these was its lack of a full frame, 35mm negative size, sensor. Because of the very short back focus of M rangefinder lenses, the M8's 10.3 mega pixel sensor measured 18x27mm (1.33x crop). This was the largest sensor that Leica could use with M lenses, given the sensor technology available in 2006. The problem is that M lenses, designed to cover the 24x36mm film format, could not provide their full field of view on the reduced size imaging area. Kodak, working with Leica, subsequently solved the technical problems and developed a full frame (24x36mm), 18.5 mega pixel sensor for Leica M lenses, permitting the introduction of the M9 camera body in 2009. The M9's sensor is made in the USA. The M9 is the smallest, lightest, highest quality and best made full frame digital camera in the world. The M9-P is the M9's twin sister, identical in all respects, but it comes with a sapphire crystal protective cover over its back panel LED monitor display. Finish options and graphics are also somewhat different. The M9-P is available in optional silver chrome finish or the black paint finish preferred by most professionals. (There is no price difference for the black finish.) Either way, it lacks the famous Leica red dot logo on the front of the body, but gains a 1950's style Leica logo engraved on the top deck. The standard M9 finish options are steel gray paint or black paint and again the price is the same for the two finishes. Eschewing the sapphire crystal LED cover, which is the only actual difference between the two versions, makes the M9 $1000 less expensive than its M9-P running mate. Design, Quality and Key Features Perhaps this would be a good place to point out that the two crucially important features that any great camera must have are (1) superior design/materials/workmanship and (2) superior lenses. Every part should be designed for durability, precision made of the best material for its specific job and assembled with care. A great camera should be ergonomically designed for easy use and built to last a lifetime, with normal maintenance. It should accept lenses of equal build quality and the highest optical performance. It must allow full user control of its basic operations (focusing, lens aperture and shutter speed), because otherwise it is difficult or impossible to control the most basic technical elements of a photograph: movement, depth of field and the precise point of focus. A camera's other miscellaneous "features," which are typically touted in advertising hype to impress the uninformed, are generally inconsequential and often an impediment to making good images. Elegant design is generally superior. Simple operation is better, because it allows you to "set and forget" the basics on your camera and then concentrate on the pictorial elements that make good photographs: viewpoint, composition, perspective, lighting, contrast, highlights and shadows, color and so forth. Even in full manual operation, you only do three things before you press the shutter release to take a photograph: focus the lens, set the lens aperture and set the shutter speed. Your eye, assisted by the coupled rangefinder, tells you when the lens is correctly focused on your subject, without looking away from the viewfinder. The built in, TTL light meter tells you when you have set the proper lens opening and shutter speed to take a correctly exposed picture, also without looking away from the viewfinder. That is all there is to operating the M9 manually. It is much easier to learn to operate an M9 manually than to figure-out and memorize the complicated programmed menus incorporated in most digital cameras. (Tragically, most digital camera owners use the "green zone" setting and never actually learn how to operate their cameras.) The M9 represents a maximum quality, but minimalist approach to digital still photography. It is designed to let the photographer concentrate on the photograph, rather than the camera. It incorporates the basic features required to make great photographs and eschews the plethora of features, standard on most other digital cameras, which have little or nothing to do with making high quality images. (Can someone explain to me why a camera should incorporate a telephone or a GPS chip? What do such things have to do with photography, for goodness sakes?) There is no "green zone" or other programmed (P) exposure modes in the M9, no auto focus, no image stabilization to degrade picture quality, no digital zoom, no smart zoom, no special effects, no video capability, no oversize LCD display, etc. M9 owners can read the Instruction Manual and actually understand the camera's operation. Photographers familiar with earlier Leica M cameras will require little familiarization with the M9, as the camera's shape, layout and operation have been made as similar to 35mm M cameras as possible. The M9 is the smallest and lightest, full 35mm format digital camera in the world. It is also quieter in operation. It is half to two thirds the size and weight of full format Nikon and Canon digital SLR cameras. The M9 weighs 20.6 ounces (with battery), while the Nikon D3X weighs 43 ounces and the Canon EOS-1Ds Mk. III weighs 42.5 ounces. All three of the top, 24x36mm format cameras are expensive, with the Leica M9 / M9-P's 2012 MSRP ($6995.00 / $7995.00) very comparable to the Nikon D3X ($7999.95) and Canon EOS-1Ds Mk. III ($6999.00). 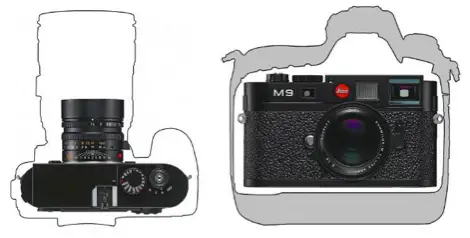 Unlike almost all other digital cameras, the M9 (and identical M9-P) camera chassis is die cast from magnesium. The top and bottom covers are brass. The lens mount is precision machined from hard stainless steel to maximize wear resistance. These bodies are hand assembled to the highest standards and closest tolerances and repeatedly tested during manufacture. Both cameras and lenses are built to last a lifetime. Because they are so well made and take such great pictures, they command the highest used prices. Leicas hold their resale value better than any other brand. 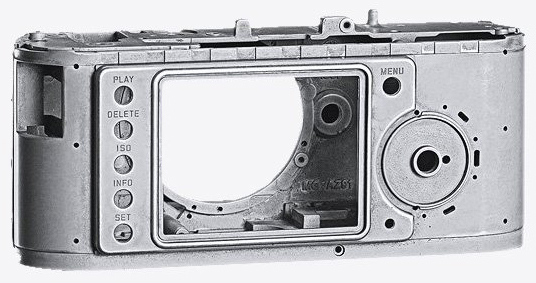 The M9 incorporates an extremely accurate and quiet metal blade shutter, which is cocked by an internal micro-motor. The TTL metering system is simple, accurate and reliable. The coupled, long base rangefinder is the most precise camera focusing system in the world. Extensive testing under controlled conditions has proven it to be more precise (especially for normal and wide angle lenses) than manually focusing an SLR and much more accurate than any auto focus system. Leica's hand made M lenses are focused by manually turning the lens barrel, which is silky smooth in operation. Aperture rings "click" in � stop increments and can be set in-between, if desired. Ergonomics and Aesthetics It happens that a round shape is naturally comfortable to hold in the human hand, much more so than shapes with squared corners or protrusions. That is why cavemen looked for round throwing rocks and baseball bats have round grips. Oskar Barnack clearly understood this principle. The Leica's thin body and round ends are a naturally perfect shape for hand holding. Back in 1925, with the introduction of the first Leica camera, Leitz got the basic body shape right and it has never changed. When seen from the top or bottom, Leica M bodies are long ovals, with straight sides and round ends. The round ends fit comfortably in human hands and the shutter speed dial and shutter release button are positioned on the top left of the body, where the forefinger naturally falls. Both hands are used to hold and operate a camera, so whether you are right or left handed, the basic grip is the same. When the camera is held horizontally (landscape format), the right hand curls around the right end of the Leica (as seen from behind) with the bottom three fingers on the front of the camera, the thumb behind the camera at the top back and the index finger on top of the camera, where it can easily reach the shutter release and shutter speed dial. The left hand cradles the lens from the bottom left, palm up, supporting the camera's weight in the palm of the hand, with the thumb and forefinger positioned to focus the lens and turn the aperture ring. The Leica M9 is shaped like and looks like a real camera, not a computer terminal with a lens stuck on the front. Beauty is in the eye of the beholder, but to most people, the Leica simply looks "right." Rangefinder Focusing All Leica M cameras feature a combined viewfinder/rangefinder. "Messsucher" is the German word for this, which is where the M designation comes from. From the time it was introduced by Leica to the 1960's (about 30 years), rangefinder focusing was the norm for interchangeable lens 35mm cameras, not only cameras made by Leica, but also cameras from Nikon, Minolta, Canon, Zeiss, Voigtlander, Argus and a score of other manufacturers in Europe, Japan and the USA. Nippon Kogaku introduced their revolutionary Nikon F SLR system camera in 1959 and Asahi Optical introduced their Pentax Spotmatic (the first SLR with TTL metering) in 1964. During the 1960's, the features of single lens reflex cameras became sufficiently advanced and their price low enough to overtake the rangefinder in popularity. Through the lens focusing by means of a mirror and prism became the norm for 35mm system cameras, although it was (and is) dimmer and less precise than rangefinder focusing with wide angle, standard and short telephoto lenses. Conversely, no one can argue against the SLR's superiority with long telephoto lenses, zoom lenses and for macro photography. The two systems have different strengths and weaknesses and Leica builds both types of cameras. Most photographers born in the 1960's and later have never used a rangefinder system camera like the Leica M9. At first, composing and focusing through a viewfinder seems foreign to them. It is very bright and you can see what is happening outside the field of view of the lens, which is delineated by bright frame lines inside the viewfinder. When you use a flash unit, you can see the flash fire and the light hit the subject; the view does not go black during the exposure, as a SLR finder does. When you focus, you use only the center rangefinder field; the rest of the field of view is sharp and you can clearly see what your subject is doing at all times. It is a revelation, but also new to many younger photographers, so I will briefly describe how to focus a Leica M series camera, borrowing heavily from the M9 Instruction Manual. The focus can be set using either the superimposed (coincident) image or split image methods. Looking through the M9 viewfinder, the bright rectangular area in the center of the view is the focusing field. To focus using the superimposed image method, look for a distinctive shape with good contrast. In portraiture, for example, it is normal to focus on the subject's eye. Center the rangefinder rectangle on the eye. If the lens is out of focus, you will see a double, or out of register, image of the eye. Turn the lens barrel (focusing helicoid) until the two images merge into a single, perfectly coincident, image. Your lens is correctly focused. To focus using the split image method, look for a strong, straight line. If you are photographing your house, for example, the near corner is a perfect target. Aim the camera so the straight line of the corner runs through the middle of the viewfinder and the bright rangefinder rectangle in the center of the viewfinder. The lens is out of focus if the straight line is displaced laterally (split) where it runs through the rangefinder field. Focus the lens barrel until the straight line is continuous, with no misalignment. At that point your lens is perfectly focused. To focus on a horizontal straight line, say a fence rail, simply hold the camera in the vertical position and focus the same way. Initially, rangefinder focusing may seem a bit strange, but it will quickly become second nature and you will appreciate its speed and precision. TTL Light Metering The M9's TTL light metering system is strongly center weighted, which is perhaps the easiest metering pattern to understand and exploit. If you remove the lens and look at the shutter curtain's five blades, you will see that the top and bottom blades are black, the next two blades are medium gray and the center blade is light gray. The silicon light meter cell, located at the bottom center with a convex lens facing the shutter, is reading the light reflecting off of the shutter blades. Lightly depressing the shutter release button to its first pressure point turns the light metering system on. If you remove your finger without taking a picture, the meter stays on for approximately 12 seconds. When the LED's in the viewfinder go out, the camera is in standby mode. If the shutter dial is set to "B," the exposure meter is disabled. The proper exposure is manually set by adjusting the aperture ring on the lens and/or the shutter speed dial on the top deck of the camera. The camera's through the lens light meter display consists of three LED's at the bottom of the viewfinder that indicate under, over and correct exposure. There are right and left triangular LED's pointing inward at a round center LED that light sequentially. The sequence is: > (under) o (correct) < (over). Thus, if the right triangular LED alone is on, you are a full f/stop (or more) over exposed. If the right triangle and the center circle are both lit, you are about � stop over. If only the center LED is on, your exposure is correct. The intensity of the lit LED's also varies to indicate smaller exposure variations. The over and under triangular LED's point in the direction you should turn the lens aperture ring or shutter speed dial to set the correct exposure. This is the same system found in the M6 and MP 35mm film cameras. It is an easy system to understand and use, as well as being very durable. Alternatively, you can set the shutter speed dial on "A" (aperture priority) and manually adjust only the lens aperture. The camera will then automatically set the correct shutter speed, which is displayed in the viewfinder. Typically, you would select a lens opening based on the depth of field your photograph requires, a crucial pictorial element. If you feel the displayed shutter speed is too low, open the lens and the shutter speed will increase in direct proportion. The Leica M Lens System Although most digital camera makers boast about the wide zoom range of their lenses (10x, 15x, 20x, etc.), the truth is that the wider the focal length range, the lower the picture quality. (All other factors, such as materials and workmanship, being equal.) The reason is that a wider zoom range necessarily means more optical design compromises than a smaller zoom range. There is no free lunch in lens design. For the same reason, fixed focal length lenses (other factors being equal) are superior in performance to a zoom lens set at the same focal length. Leica offers a variety of lenses for M series cameras. All are hand made in Germany and most come with lens hoods. None are zoom lenses, although one, the f/4 Tri-Elmar-M ASPH ultra-wide angle lens, can be set to three specific focal lengths,16mm, 18mm and 21mm. (Uh, let's see, that would be a 1.3x "zoom" range--if it were a zoom lens.) Note that the f/stop of this lens does not change as the different focal lengths are selected, one mark of a premium variable focal length lens. Leica lenses are simply the finest available for 35mm film and digital photography. Current Leica M lenses include: VARIABLE WIDE ANGLE
WIDE ANGLE
STANDARD
TELEPHOTO
Note that the M9, like most other M series bodies, has frame lines in the viewfinder for lens focal lengths from 28mm to 135mm. Lenses wider than 28mm come with separate viewfinders for composing that mount in the camera's accessory shoe. Leica lenses for M cameras have been made since 1954 in most of these same focal lengths. Some Leica lenses, for example the 50mm f/2.0 Summicron-M, have become legendary. Naturally, the designs have been updated over the years, but all Leica-M lenses represent the very highest level of performance and quality available at the time of manufacture. I have tested a good many Leica M lenses made in the 1980's and 1990's. Their picture quality (resolution, contrast, color fidelity, aberration correction, etc.) still exceeds that of any other manufacturers' lenses I have tested. The latest Leica lens designs incorporating aspheric (ASPH) lens elements are the sharpest photographic lenses I have ever tested in their focal lengths. Every Leica lens is carefully machined and polished, hand assembled, tested at every stage of the manufacturing process and must pass a final, definitive optical and mechanical performance test before being packaged and shipped to a Leica dealer. Lenses that fail to meet Leica's rigorous specifications at any point in the manufacturing process, including the final testing after completion, are not set aside for adjustment; they are destroyed on the spot. (A technician with a pointed hammer drives it right through the center of the lens!) There are no Leica lens "seconds." Leica lens barrels are usually made of brass or aluminum, while focusing helicoids are brass. (Brass slides smoothly on aluminum and resists sticking.) All M lenses are focused manually, are engraved with distance and depth of field scales and automatically couple to the camera's rangefinder when attached. Leica designs their own lenses and maintains their own laboratory to develop exotic, proprietary glasses. The individual optical glass lens elements are ground with extreme precision and receive index matched multi-coatings. These are not plastic lenses and they are very durable and long lasting, with the highest resale value. I have, for example, owned Leica thread mount rangefinder lenses made before the beginning of the Second World War and they still worked perfectly and delivered excellent photographic results. Incidentally, most Leica thread mount lenses can be used on M series camera bodies by means of a Leica 39mm thread to M adaptor ring that bayonets into the M body and accepts Leica thread mount lenses. M9 and M9-P Specifications GENERAL
FLASH EXPOSURE CONTROL
VIEWFINDER
DISPLAYS
SHUTTER AND RELEASE
CAMERA BODY
Did you read all the way through the above specifications? They are lengthy, but you should. They include some details and features I am not going to mention elsewhere in this review, for the simple reason that they have little relevance to my photographic needs. Battery and Charger The M9 is shipped with a depleted battery that must be charged before the camera can be used. An external battery charger is included with the camera. Remove the camera's bottom plate to change batteries or SD cards, just as you would remove the bottom plate of a 35mm Leica M camera to load film. To charge the 3.7V lithium ion battery, insert the battery into the charger and plug the charger into the wall, using the appropriate mains cord. Unlike NiCad batteries, lithium ion batteries can be charged at any time without damage. The battery is good for several hundred charging cycles. The green LED on the charger flashes as the battery is being charged. When the battery reaches about 80% capacity, a yellow LED lights. This takes about two hours of charging with a depleted battery. With an 80% charge, the battery should be good for about 280 pictures. Full (100%) charging requires about 3.5 hours and at that point the green LED stops flashing and stays on. The charger will not over-charge the battery. A fully charged battery is good for about 350 photos. With two batteries and two SDHC memory cards, charging and downloading them alternately, you should be able to shoot almost continuously (a photo about every 40 seconds) until the batteries reach the end of their useful life (multiple hundreds of charge cycles per battery). I am no mathematician, but I calculate that to be perhaps 350,000 pictures! Camera Layout and Controls The M9's camera controls, except for the back panel, are similar to those on M series film cameras, especially the M7. Since the M9 does not use film, the top deck dispenses with the film advance lever and rewind knob. What remains on top of the camera is an ISO hot accessory shoe, shutter speed dial, and shutter release button with a concentric master power switch. The switch positions are OFF, single picture (S), continuous series of pictures (C) and self timer (represented by a timer symbol). 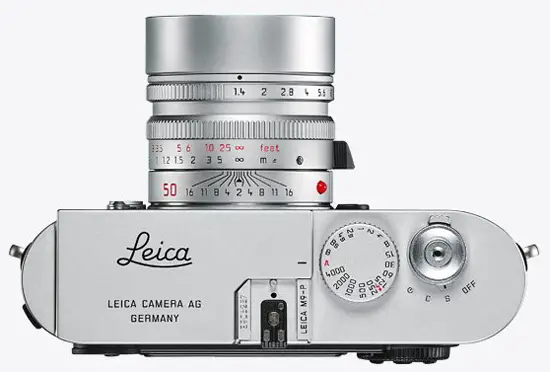 The bottom of the camera has a removable base plate, just like previous M series cameras. The digital M9 does not use film, so instead of loading or unloading film cassettes, the bottom plate is removed to load or remove the battery and SD memory card. There is a tripod socket in the center of the bottom plate. Across the upper front of an M9 are the square rangefinder, bright line frame illumination and viewfinder windows, as well as the round brightness sensor. Below these are the lens mount release button, bayonet lens mount and bright line frame preview lever. This is the standard M camera front layout, dating back to the M3. 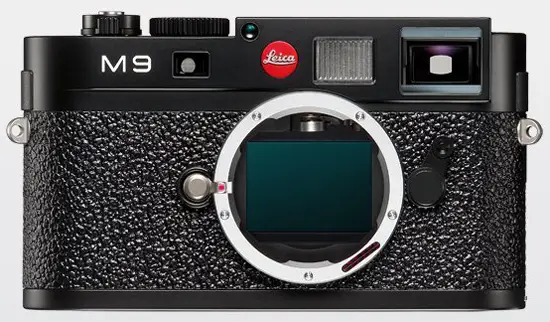 The camera ends are where the stainless steel strap lugs are located and immediately above the strap lugs are plastic bumpers to protect the finish from strap wear. Again, this is standard Leica fare. Unlike film cameras, on the left end of the M9 there is a plastic cover panel that, when opened, reveals a USB port for connecting to computers. The top, bottom, front and ends of the M9/M9-P are thus very similar to M series film cameras. The back of the M9/M9-P is different from film cameras, although similar to the previous M8 digital camera. At the top left is the viewfinder eyepiece, just as on any M camera. The apparent distance of items in the viewfinder is one meter and its basic correction is -0.5 diopter. Diopter correction lenses are available and thread into the viewfinder eyepiece. The center area of the M9's back is dominated by an LCD monitor screen. At the upper right side of the monitor screen is the small MENU button. This selects the main menu functions, some of which are discussed below. Immediately to the right of the monitor screen is a large, round, four-way switch with a concentric rotary dial. The central four way switch provides direction buttons (indicated by up/down/left/right arrow heads), that allow navigation in the menus, selecting menu items or functions and scrolling through the picture memory. The concentric rotary dial provides several functions, including navigating menus, setting menu items, scrolling and enlarging or reducing the size of photos being reviewed. 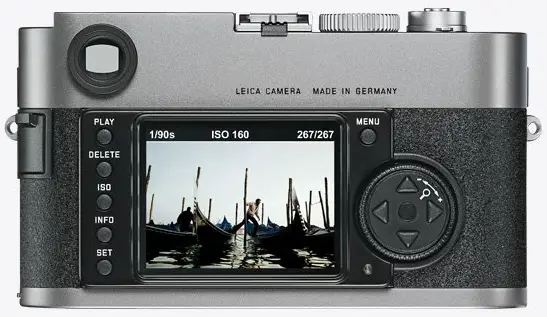 To the right of the LCD monitor screen are a line of five small buttons. From top to bottom, these are:
Menus The M9 has two menus. There is the Main Menu (28 items), which is accessed by pressing the MENU button. There is a separate Image Parameters Menu (six items), which is called forth by pressing the SET button. The SET button is also used to select items on the Main Menu and for saving settings in both menus, which I find a bit confusing. I would have preferred a unique "PM" button to select the Parameters Menu. Main Menu Functions I am not going to attempt to explain all 28 functions, most of which are seldom or never used and a number of which could be deleted to simplify the system without being missed. For example, the clock/calendar function contributes nothing to picture taking; it's just something else you have to set. When a "Standard" setting is available, such as for the Advance, Sharpening, Contrast, Monitor Brightness and Histogram functions, it works well for most purposes. Following are some functions that I have found useful, or at least worth mentioning.
Parameters Menu Functions As previously mentioned, the Image Parameters Menu is accessed by pressing the SET button. It includes six items, three of which are important.
Accessories Immediately after acquiring my M9, I accessorized it by the addition of a monitor screen protector, Leica Handgrip M (#14486 for black M9 and M9-P cameras; approx. $250), spare Leica battery pack #14464 (approx. $130) and a couple of SDHC memory cards (about $8 each on sale). Since the M9 lacks the M9-P's sapphire glass monitor screen cover, after-market adhesive glass covers are available to protect the M9's LED monitor display. Mine is a Giottos Aegis SP-80 series cover made from tempered Schott optical glass to which a 12-layer anti-reflection multi-coating, plus waterproof and anti-fingerprint coatings, has been applied to both sides. The 2012 discount retail price is about $22. It is not sapphire glass, but it is enough protection for my purposes. The accessory Handgrip M allows a secure, one hand grip on the M9 when it is in use and helps keep the camera's rangefinder and viewfinder windows free of fingerprints. This petite grip is notable for its excellent design. It is integral with a replacement bottom plate the same size and thickness as the original, so it adds no bulk to the bottom of the camera. It does not interfere with the camera's tripod socket. To attach the handgrip, you simply remove the camera's stock bottom plate (a half turn of the toggle key does the trick) and replace it with the handgrip/bottom plate. The Handgrip M is sized for a three finger grip; your index finger falls on the shutter release button and your thumb is on the back of the camera. The grip hugs the camera body. It is no bigger or bulkier than it needs to be. The only caveat regarding the Handgrip M is that I found I could not mount a 135mm f/2.8 Elmarit-M lens with 1.5x finder attachment ("google eyes") while the grip is attached. The large google eye fixture bumped the grip and prevented me from aligning the two red mount dots to attach the lens. It doesn't take long to temporarily remove the bottom plate/grip, bayonet the lens in place and reattach the bottom plate/grip. The lens can then be used normally. To remove the lens, you will have to again remove the grip. This is what I did when testing the 135 f/2.8 on the M9, but if I were planning on shooting extensively with that lens during a photo session, I would simply use the camera's original bottom plate and forego the grip. More recent 135mm lenses that lack google eyes are a better choice for use on the M9 and they do not interfere with the Handgrip M. A spare battery seems like a reasonable precaution. If kept charged and ready for use, it may come in handy, particularly for the traveling photographer. Leica branded batteries are more expensive than after market batteries, but more reliable and longer lasting. The M9 uses the same SD memory cards as my older Digilux-1. Leica seems to have standardized on SD/SDHC cards. They specifically recommend SanDisk and Lexar Extreme III and Professional cards and note in the Instruction Manual that some, particularly unbranded, cards do not fully comply with SD and SDHC standards. Inferior cards will not damage the camera, but they may not work correctly. I used the M9 with 64 MB Leica SD and 4 GB Lexar SDHC cards with equally good results. Larger memory capacity cards are available at higher cost, but I chose Lexar 4 GB cards, as that is plenty of capacity for my purposes and I'd rather have four 4 GB cards than one 16 GB card. Camera Bags The M9 is, after all, a very expensive camera and I would hate to drop it. Yet, I have never liked camera straps or "ever ready" cases, as I find they get in the way, particularly when using a tripod. I prefer to carry a system camera with the lenses and accessories I need in an appropriate size camera bag and such bags always incorporate a wide carrying strap. I have a LowePro Elite AW camera bag that holds my entire M system, in addition to my Digilux-1 camera. I also have several smaller Lowe Pro and Tamrac bags useful for carrying the camera body and one to three lenses for specific purposes. A selection of different size camera bags is very useful to a photographer working in the field. Filters The front elements of all of my Leica lenses are protected by German made Leica, Heliopan or B+W UV filters. These are not required, but I feel better with them in place. Most other filter purposes (light balancing, controlling contrast and brightness and so forth) can now be accomplished electronically by the camera or in Photo Shop, so most photographers no longer need an extensive array of filters. Tripods The old saying among landscape photographers is the difference between a professional and an amateur is that the pro always uses a tripod and the amateur never does. There is a lot of truth in that, because if you are not using an electronic flash, it is nearly impossible to get truly sharp pictures without a steady camera support. A tripod is usually the handiest camera support around. (Monopods aren't steady enough for critical photography.) I own several Bogen/Manfrotto tripods, suitable for cameras ranging from 35mm to 8x10" formats. For Leica M's, the #3025 head on #3001 legs is a lightweight combination that works well. Gitzo, Tiltall and Slik are other good tripod brands. Electronic Flash After due consideration, I did not order a dedicated flash with the M9. There are three reasons for this: I no longer do a lot of flash photography; I already own a number of good flash units with their associated off camera cords, slaves, etc; I have read about the drawbacks of TTL pre-flash exposure determination, among which are shortened battery life and the fact that many subjects have their eyes closed, because of the first flash, when the picture taking flash fires. A good many experienced photographers prefer to use a flash unit with an external metering sensor in "Auto" mode, instead of digital TTL flash metering. The only real drawback to this is that you must manually set the required aperture on the lens for proper exposure. Interestingly, when I tried a Nikon SB-24 professional flash in Automatic (not TTL) mode with the M9, it not only worked perfectly, the flash even commanded the M9's shutter to set the correct 1/180 second flash synchronization speed. If you do not already own an appropriate electronic flash unit, Leica offers two dedicated models for M9 owners with TTL, Auto and Manual control modes. There is the SF 58, a professional size and style flash with the capabilities and plethora of features you would expect in a professional flash unit, including a tilting and turning main reflector head, secondary "fill light" reflector and off camera slave operation. If your flash needs are more moderate, running to travel photos, family photos and the like, the compact SF 24D costs less and will probably suffice. Lenses The whole point of any system camera is interchangeable lenses. Having previously owned several Leica M series cameras I have, over time, collected a reasonable set of lenses. These include the Leica 21mm f/2.8 Elmarit-M, 28mm f/2.8 Elmarit-M., 35mm f/2.0 Summicron-M, 50mm f/2.0 Summicron-M, 90mm f/2.0 Summicron-M, 135mm f/3.4 APO-Telyt-M ASPH and 135mm f/2.8 Elmarit-M. All of these work fine on the M9, with the possible exception of the 135mm f/2.8 Elmarit-M. I was curious about the performance of the 135mm f/2.8 telephoto lens with the M9, since its google eyes, which magnify the viewfinder/rangefinder image for more precise focusing, cover the M9's brightness (ambient light) sensor. This sensor is located at the top front of the camera body, between the rangefinder and frame illumination windows. When this lens was designed, M bodies did not have ambient brightness sensors and I had heard that the compatibility of this lens with the M9 camera was questionable. Certainly it is awkward to use in conjunction with the accessory Handgrip M, as described above. As an stop-gap, I stuck a piece of white tape to the backside of the google eye frame (which is black) to reflect more light at the brightness sensor. (There is about a 1/8 inch gap between the back of the google eye frame and the brightness sensor, which is located at the very top front of the camera body, so some light does reach the sensor.) If the Elmarit-M was my only 135mm lens, I would probably have a machinist friend of mine drill a hole through the google eye frame in front of the brightness sensor. However, with the M9, I will exclusively use the 135mm f/3.4 APO-Telyt-M ASPH, as it eliminates the Elmarit-M's problems with the Handgrip M and the brightness sensor. The f/3.4 APO-Telyt-M ASPH is, in any case, the sharpest 135mm telephoto I have ever tested. Summary and Conclusion Here are some key points to remember about the Leica M9 and M9-P cameras. First and foremost, with their associated Leica M lenses they produce stunning, film-like photographs with maximum detail and sharpness per pixel. They are the world's smallest and lightest full frame (approx. 24x36mm sensor area) digital cameras, about half the weight of comparably priced Nikon and Canon DSLR's. Their basic design has stood the test of time. They represent the best available build quality, with an all metal body hand assembled to the tightest tolerances. They are part of the Leica M photographic system and accept the great majority of Leica-M lenses made from 1954 (when the first Leica M camera was introduced) to the present day. Important features include an ergonomically correct body shape, much simpler control layout and more convenient operation than similarly priced Nikon and Canon DSLR's; a very bright, integrated viewfinder/rangefinder; super accurate rangefinder focusing; TTL metering of available light and electronic flash; aperture priority automatic and true manual analog operation, including lens aperture, lens focus and shutter speed; auto or manual lens detection; selectable auto power off to extend battery life; excellent automatic white balance and comprehensive manual white balance settings; DNG (18 MP), JPG Fine and JPG Basic photo recording modes. In JPG recording mode, resolution can be set from 1 MP to 18 MP. The rechargeable lithium ion camera battery is charged externally and rapidly using the included charger with US, Euro and automobile adaptor cables. Leica M lenses are the world's best 35mm format camera lenses, both optically and mechanically. They are hand made with machined aluminum and brass barrels, exotic optical glasses and index matched multi-coatings. Leica M cameras and lenses are made to last a lifetime. Unlike most other digital cameras, Leica M9 cameras and lenses are a long term investment and their resale value is high. |